LSFM/STPT Guide#
This guide focuses on our most common workflow (IF/iDISCO –> LSFM –> atlas registration –> voxel-wise stats –> cluster validation).
These video tutorials cover roughly similar content, but please refer to this guide and command help guides for additional info.
For getting started, test commands using these downsampled images from an example mouse.
For instructions, see this UNRAVEL_commands.txt
If you are unfamiliar with the terminal, start here:
Refer to common commands and tips in this cheat sheet (click to expand dropdown):
Terminal command cheat sheet
Working Directory
The working directory, or current directory, is the folder in the file system that a user or program is currently accessing.
Default Location: The terminal typically starts in your home directory.
Relative Paths: Commands use paths relative to the working directory.
Changing Directories: Use
cd /path/to/directoryto change the working directory.Viewing the Directory: Use
pwdto display the current working directory.Importance: Knowing your working directory is often crucial for executing commands and managing files as intended.
Stopping Commands
Ctrl + C: Interrupt the command
Learning About Commands
Help Option: Many commands offer a
--helpoption to provide a quick overview of usage. For example,ls --helporls -h.Manual Pages: Use
man <command>to access the manual page for detailed information about a command. For example,man lsprovides options and descriptions for thelscommand.which: Usewhich <command>to locate the executable file for a command. For example,which pythonshows where the Python interpreter is installed.
Listing Files
ls: List files and directories.ls -l: List files in long format, including details like permissions, size, and modification date.ls -a: List all files, including hidden files, which start with a “.” (unravel commands are logged in a hidden file [.command_log.txt]).ls -1: List files in a single column.
Viewing and Creating Files
cat <filename>: Display the contents of a file.echo "string" > new.txt: Create a new file namednew.txtand write “string” to it.echo "string" >> new.txt: Append “string” to the existingnew.txtfile.touch new.txt: Create a new file that is empty
File/Folder Management
mkdir <dir_name>: Make directoryrm -rf <dir_name>: Delete folder and all contents recursively (be careful where you run this and what patterns you use)rm <file>orrm <path/file>
Navigation and Shortcuts
Tab completion: Use tab to auto-complete file and directory names.
Up arrow: Scroll through command history. In zsh, type a partial command and press the up arrow to find past commands starting with the typed string.
cd <path>: Change the current directory to<path>. Drag/drop a file or folder into the terminal to paste the path to it. Or select the file/folder, hit Ctrl + C, select the terminal, and press Ctrl + Shift + V.cd <Tab>orcd <Tab Tab>: To see folders in the working dir that you can cd to (with zsh use Tab and Shift + Tab to cycle –> enter or space)cd ..: Move up one directory level.cd ../..: Move up two directory levels.cd ../dir: Move up one directory and then intodir.cd -: Switch to the previous directory.cd: Change to the home directory.cd ~/: Change to the home directory using the tilde shortcut.
Command History
history: Print the history of terminal commands!3: Run the third command in the historycat .command_log.txt: Print the history of unravel commandscat .command_log.txt | tail -10: Print the last 10 linescat .command_log.txt | head -10: Print the first 10 lines
Keyboard Shortcuts
Copy/Paste:
Ctrl + Shift + C: Copy textCtrl + Shift + V: Paste text.Or select text and click the middle wheel on the mouse to copy and paste.
Movement:
Ctrl + A: Move to the beginning of the line.Ctrl + E: Move to the end of the line.Ctrl + Arrow: Move word by word.
Deleting:
Ctrl + W: Delete the word before the cursor (space-separated for bash, additional delimiters for zsh).Ctrl + U: Delete from the cursor to the beginning of the line.Ctrl + K: Delete from the cursor to the end of the line.Ctrl + Y: Paste the last killed text.
Find:
Ctrl + Shift + F: Open the search bar to find text.
Command Execution and Scripting
Using
;vs.&:;chains commands to execute sequentially, while&runs a command in the background.Another way to chain commands is to “pipe” (“|” character) the output from one command (what would be printed to the terminal) so it is used as the input of the next command
For example,
cat <filename> | wc -l: Cat would print the contents of, but here this is used as the input for wc, which counts the number of lines (e.g., rows in a csv)
Parentheses
()for multi-line commands: Group commands to execute them in a subshell.
Global Variables
$PWD: Variable with the current working directory path.$PATH: List of directories that have executable files. Allows for executing scripts without providing the full path (e.g., path/script.py –> script.py). Folders with UNRAVEL scripts don’t need to be added to the $PATH if it installed w/pip.See this guide to define common command arguments as global variables in env_var.sh (so they can be loaded in each terminal session)
Batch Processing Via Loops
For loops examples:
for d in dir* ; do original_dir=$PWD ; cd $d ; pwd ; cd $original_dir ; donefor s in sample?? ; do cat $s/parameters/metadata.txt ; donefor d in <space separated list of experiment folder> ; do cd $d ; for s in sample?? ; do echo $s ; done ; donefor i in 1 2 3 4; do echo $i ; donefor i in {1..10}; do echo $i ; doneParallel processing w/ &:
for i in *.nii.gz ; do fslmaths $i -bin ${i::-7}_bin -odt char & done # Binarizes all images, output data type 8-bit, ${i::-7} trims last 7 characters in bash (does not work in zsh)(runechoto see when processes are done).
Variables and Substitution
$PWD: Variable with the current working directory path.$(): Command substitution to capture output for use in commands (e.g.,x=$(for ))
File Searching and Manipulation
find: Search for files in a directory hierarchy.find . -name "*.txt": Search for text files matching this pattern.find $PWD -name "*.txt" -exec rm {} \;: Find all.txtfiles and delete them.
grep: Search text using patterns.grep -r <string_in_files>: Recursively search for a patterngrep -r --exclude-dir=docs <pattern>: Search for a pattern while excluding specific directories.grep -r <pattern1> | grep <pattern2>: Search for a pattern filter to preserve lines with a second stringgrep -r <pattern1> | grep -v <pattern2>: Search for a pattern filter to exlude lines with a second string
fzf: A command-line fuzzy finder that allows you to search and filter items interactively, providing a fast and efficient way to locate files, commands, or history entries.
Text Processing
sed: Stream editor for filtering and transforming text.sed 's/old/new/g' file: Replace all occurrences ofoldwithnewinfile(use *.txt for multiple files)
Aliases
Aliases are shortcuts for longer commands or sequences of commands, making it easier and quicker to execute frequently used commands. You can create aliases in your shell configuration file (like .bashrc for Bash or .zshrc for Zsh).
How to Create Aliases:
Open your shell configuration file (.bashrc or .zshrc) with VS Code or nano
# For example:
nano ~/.bashrc  # For Bash users
Add alias definitions in the format:
alias shortname='full command'
For example:
alias ll='ls -l'
alias ilastik='path/to/ilastik_executable'  # For launching Ilastik via the terminal by running: ilastik
alias i="io_nii_info -i "
alias gs='git status'
Save the file and reload your configuration:
source ~/.bashrc # For Bash users
FSL Commands for NIfTI files (.nii.gz extension)
fslmaths: Perform mathematical operations on images.addsub,bin(binarize)uthr(Zero out intenisties above upper threshold)thr(Zero out intenisties below threshold)mas(mask).Use
-odtat end to set output data type (char for 8-bit and short for unsigned 16-bit). Default is float 32-bit. Pay attention to the max range that each data type can represent (e.g., 255 for 8-bit and 65,535 for 16-bit).“.nii.gz” is automatically added
Examples:
fslmaths img_1 -bin img_1_bin -odt char # char is for 8-bitfslmaths img_2 -mas img_1_bin -odt short # This used img_1_bin as a maskfslmaths img_1_bin -mul -1 -add 1 img_1_bin_inv -odt char # This inverts a maskfslmaths img_1 -sub img_2 diff # Then check if the images are the same: fslstats diff -Rfslmaths img_1 -sub img_1 blank # Make an empty image for adding masks of each regionfor i in 1 56 672 ; do fslmaths atlas -thr $i -uthr $i region_${i} -odt shortfor i in region_mask*.nii.gz ; do fslmaths blank -add $i blank ; done ; mv blank.nii.gz all_regions.nii.gz
fslstats: Compute statistics on images (-R, -V, -M)fslroi: Crop or expand images.fslcpgeom: Copy header info (e.g., resolution and position in global space for viewing) from one image to another.
Killing a Process
If Ctrl + C doesn’t stop the command, you can kill the process:
Find the Process ID (PID):
Use
ps aux | grep <process_name>to find the PID of the process. Replace<process_name>with the name of the command or process you want to stop.Alternatively, use
pgrep <process_name>to directly get the PID.
Kill the Process:
Use
kill <PID>to send a termination signal to the process. Replace<PID>with the actual process ID.If the process doesn’t stop, force it with
kill -9 <PID>.
Command Help Guides#
For help on a command, run this in the terminal:
<command> -h
Help guides often include info on prereqs, inputs, outputs, next steps, usage, and other notes.
Viewing the terminal help provides default values and additional options not covered in this guide.
Provide -v when running commands for verbose mode (to see info about function calls, parameters, etc.)
Syntax related to commands
The symbols < and > indicate placeholders. Replace <command> with the actual command name you want to learn more about.
Square brackets [ ] in command syntax signify optional elements.
Double backticks are used in help guides to indicate a command. (e.g., ``command``)
Asterisks act as wildcards for matching patterns in strings
?? means two digits
To view help on arguments for each command in the online documentation, go to the page for that module/script, scroll to the parse_args() function, and click the link for viewing the source code.
Listing Commands#
# List common commands
unravel_commands -c

# List common commands, aliases, and descriptions:
uc -cad

# List all commands matching a string (e.g., vstats):
uc -ad -f vstats  # Find commands related to voxel-wise stats

# List all commands and the modules/scripts that they run:
uc -m
Hint
Prefixes group together related commands. Use tab completion in the terminal to quickly view and access sets of commands within each group.
Common Commands#
reg_prep: Prepare registration (resample the autofluo image to lower res).
reg: Perform registration (e.g., register the autofluo image to an average template).
reg_check: Check registration (aggregate the autofluo and warped atlas images).
reg_check_fsleyes: Check registration using the aggregated images.
warp_to_atlas: Warp full res tissue space images to atlas space.
warp_to_native: Warp images to native img space, unpad, and scale to full res.
warp_to_fixed: Warp full res tissue space images to fixed img space and unpad.
seg_copy_tifs: Copy TIF images (copy select tifs to target dir for training ilastik).
seg_brain_mask: Create brain mask (segment resampled autofluo tifs).
seg_ilastik: Perform pixel classification w/ Ilastik to segment features of interest.
vstats_prep: Prepare immunofluo images for voxel statistics (e.g., background subtract and warp to atlas space).
vstats_z_score: Z-score images.
vstats_z_score_cwd: Z-score images in the current working directory.
vstats_whole_to_avg: Average left and right hemispheres together.
vstats_check_fsleyes: Check vstats inputs with fsleyes.
vstats: Compute voxel statistics.
cstats_fdr_range: Get FDR q value range yielding clusters.
cstats_fdr: FDR-correct 1-p value map → cluster map.
cstats_mirror_indices: Recursively mirror cluster maps for validating clusters in left and right hemispheres.
cstats_validation: Validate clusters w/ cell/label density measurements.
cstats_summary_config: Copy a config file for cstats_summary to the working dir.
cstats_summary: Summarize info on valid clusters (run after cluster_validation).
rstats: Compute regional cell counts, regional volumes, or regional cell densities.
rstats_summary: Summarize regional cell densities.
io_metadata: Save raw voxel dimensions in microns and image dimensions to parameters/metadata.txt.
io_nii_info: Print info about NIfTI files.
img_math: Perform mathematical operations on 3D images.
img_avg: Average NIfTI images.
img_unique: Find unique intensities in images.
img_max: Print the max intensity value in an image.
img_spatial_avg: Perform spatial averaging on images.
img_rb: Apply rolling ball filter to TIF images.
utils_region_info: Look up region info (e.g., find ACB to see its region name and ID)
utils_agg_files: Aggregate files from sample directories.
utils_prepend: Prepend conditions to files using sample_key.csv.
utils_rename: Rename files.
All commands
reg_prep: Prepare registration (resample the autofluo image to lower res).
reg: Perform registration (e.g., register the autofluo image to an average template).
reg_affine_initializer: Part of reg. Roughly aligns the template to the autofl image.
reg_affine_initializer_check: Check initially aligned template.
reg_check: Check registration (aggregate the autofluo and warped atlas images).
reg_check_fsleyes: Check registration using the aggregated images.
reg_check_brain_mask: Check brain mask for over/under segmentation.
warp_to_atlas: Warp full res tissue space images to atlas space.
warp_to_fixed: Warp full res tissue space images to fixed img space and unpad.
warp_to_native: Warp images to native img space, unpad, and scale to full res.
warp: Warp between moving and fixed images (these have 15% padding from reg)
seg_copy_tifs: Copy TIF images (copy select tifs to target dir for training ilastik).
seg_brain_mask: Create brain mask (segment resampled autofluo tifs).
seg_ilastik: Perform pixel classification w/ Ilastik to segment features of interest.
seg_labels_to_masks: Convert each label to a binary .nii.gz.
vstats_apply_mask: Apply mask to image (e.g., nullify artifacts or isolate signals).
vstats_prep: Prepare immunofluo images for voxel statistics (e.g., background subtract and warp to atlas space).
vstats_z_score: Z-score images.
vstats_z_score_cwd: Z-score images in the current working directory.
vstats_whole_to_avg: Average left and right hemispheres together.
vstats_hemi_to_avg: If left and right hemispheres were processed separately (less common), average them together.
vstats_check_fsleyes: Check vstats inputs with fsleyes.
vstats: Compute voxel statistics.
vstats_mirror: Flip and optionally shift content of images in atlas space.
cstats_fdr_range: Get FDR q value range yielding clusters.
cstats_fdr: FDR-correct 1-p value map → cluster map.
cstats_fstat_sig_vx_mask: Make FDR mask by thresholding and combining f-stat 1-p maps.
cstats_mirror_indices: Recursively mirror cluster maps for validating clusters in left and right hemispheres.
cstats_validation: Validate clusters w/ cell/label density measurements.
cstats_summary_config: Copy a config file for cstats_summary to the working dir.
cstats_summary: Summarize info on valid clusters (run after cluster_validation).
cstats_org_data: Organize CSVs from cluster_validation.
cstats_group_data: Group bilateral cluster data.
cstats: Compute cluster validation statistics.
cstats_index: Make a valid cluster map and sunburst plots.
cstats_brain_model: Make a 3D brain model from a cluster map (for DSI studio).
cstats_table: Create a table of cluster validation data.
cstats_prism: Generate CSVs for bar charts in Prism.
cstats_legend: Make a legend of regions in cluster maps.
cstats_sunburst: Make CSVs for a sunburst plot of regional volumes.
cstats_find_incongruent_clusters: Find clusters where the effect direction does not match the prediction of cstats_fdr (for validation of non-directional p value maps).
cstats_crop: Crop clusters to a bounding box.
cstats_mean_IF: Compute mean immunofluo intensities for each cluster.
cstats_mean_IF_summary: Plot mean immunofluo intensities for each cluster.
cstats_clusters: Make a cluster index image from a .nii.gz image.
effect_sizes: Calculate effect sizes for clusters.
effect_sizes_sex_abs: Calculate absolute effect sizes by sex.
effect_sizes_sex_rel: Calculate relative effect sizes by sex.
rstats: Compute regional cell counts, regional volumes, or regional cell densities.
rstats_summary: Summarize regional cell densities.
rstats_mean_IF: Compute mean immunofluo intensities for regions.
rstats_mean_IF_in_seg: Compute mean immunofluo intensities in segmented voxels.
rstats_mean_IF_summary: Plot mean immunofluo intensities for regions.
io_metadata: Save raw voxel dimensions in microns and image dimensions to parameters/metadata.txt.
io_convert_img: Convert a 3D image to another format. Supports .czi, .tif, .nii.gz, .zarr.
io_nii_info: Print info about NIfTI files.
io_nii_hd: Print NIfTI headers.
io_nii: NIfTI I/O operations (binarize, convert data type, scale, etc).
io_reorient_nii: Reorient NIfTI files.
io_nii_to_tifs: Convert NIfTI files to TIFFs.
io_nii_to_zarr: Convert NIfTI files to Zarr.
io_zarr_to_nii: Convert Zarr format to NIfTI.
io_h5_to_tifs: Convert H5 files to TIFFs.
io_tif_to_tifs: Convert TIF to TIFF series.
io_img_to_npy: Convert images to Numpy arrays.
io_zarr_compress: Compress .zarr or decompress .zarr.tar.gz files.
img_math: Perform mathematical operations on 3D images.
img_avg: Average NIfTI images.
img_unique: Find unique intensities in images.
img_max: Print the max intensity value in an image.
img_bbox: Compute bounding box of non-zero voxels in an image.
img_spatial_avg: Perform spatial averaging on images.
img_rb: Apply rolling ball filter to TIF images.
img_DoG: Apply Difference of Gaussian filter to TIF images.
img_pad: Pad images.
img_resample: Resample images.
img_extend: Extend images (add padding to one side).
img_transpose: Transpose image axes.
img_modify_labels: Modify labels (drop or keep IDs and optionally binarize the result).
img_filter_objects_by_size: Filter objects in a segmentation image by size.
atlas_relabel: Relabel atlas IDs.
atlas_wireframe: Make an atlas wireframe.
utils_get_samples: Test –pattern and –dirs args of script that batch process sample?? dirs.
utils_process_samples: Use this for batch processing when commands lack that functionality.
utils_region_info: Look up region info (e.g., find ACB to see its region name and ID)
utils_agg_files: Aggregate files from sample directories.
utils_agg_files_rec: Recursively aggregate files.
utils_prepend: Prepend conditions to files using sample_key.csv.
utils_rename: Rename files.
utils_toggle: Toggle sample?? folders for select batch processing.
utils_clean_tifs: Clean TIF directories (no spaces, move non-tifs).
coords_points_to_atlas: Warp cell centroids in tissue space to atlas space.
coords_points_to_img: Populate an empty image with point coordinates.
coords_img_to_points: Convert and image into points coordinates.
coords_resample_points: Resample a set of points [and save as an image].
coords_points_compressor: Pack or unpack point data in a CSV file or summarize the number of points per region.
More info on commands
unravel_commands runs ./<repo_root_dir>/unravel/unravel_commands.py
Its help guide is here: unravel.unravel_commands
Commands are defined in the [project.scripts] section of the pyproject.toml in the root directory of the UNRAVEL repository (repo).
If new commands are added to run new scripts (a.k.a. modules), reinstall the unravel package with pip.
cd <path to the root directory of the UNRAVEL repo>
pip install -e .
Set Up#
Recommended steps to set up for analysis:
Back Up Raw Data#
For Heifets lab members, we keep one copy of raw data on an external drive and another on a remote server (Dan and Austen have access)
Stitch Z-stacks#
We use ZEN (blue edition) since we have a Zeiss Lightsheet 7
Batch stitching settings
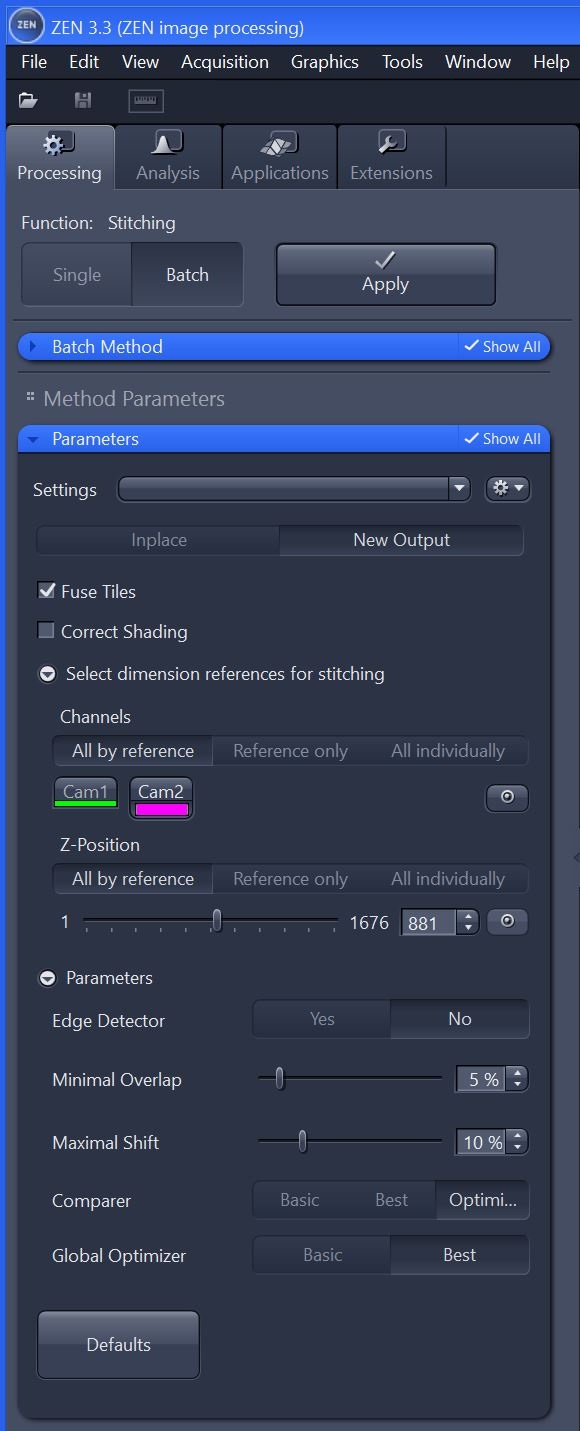
Select a mid-stack reference slice. Ideally, tissue will be present in each tile of the reference slice.#
Running batch stitching

Drag and drop images to be stitched into this section.
For each image in the list, apply the stitching settings one by one (do not go back to a prior image, as settings will no longer stick).
Select all images (control + A or shift and click)
Click “Check All”
Click “Run Selected”
Open source options for stitching
Make Sample Folders#
Make a folder named after each condition in the experiment folder(s)
. # This root level folder is referred to as the experiment directory (exp dir)
├── Control
└── Treatment
Make sample folders in the directories named after each condition
Name sample folders like sample01, sample02, …
This makes batch processing easy.
Use a csv, Google sheet, or whatever else for linking sample IDs to IDs w/ this convention.
Other patterns (e.g., sample???) may be used (commands have a -p option for that).
.
├── Control
│   ├── sample01
│   └── sample02
└── Treatment
    ├── sample03
    └── sample04
Add Images to sample?? Directories#
For example, image.czi, image.h5, folder(s) with tif series, or an .ome.tif.
.
├── Control
│   ├── sample01
│   │   └── <raw/stitched image(s)>
│   └── sample02
│       └── <raw/stitched image(s)>
└── Treatment
    ├── sample03
    │   └── <raw/stitched image(s)>
    └── sample04
        └── <raw/stitched image(s)>
Data can be distributed across multiple drives
Paths to each experiment directory may be passed into scripts using the -d flag for batch processing
This is useful if there is not enough storage on a single drive.
Also, spreading data across ~2-4 external drives allows for faster parallel processing (minimizes i/o botlenecks)
If SSDs are used, distrubuting data may not speed up processing as much.
Log Paths, Commands, etc.#
Make an exp_notes.txt
This helps with keeping track of paths, commands, etc..
cd <path/to/dir/with/sample?? folders>
touch exp_notes.txt  # Make the .txt file
Automatic logging of scripts
Most scripts log the command used to run them, appending to ./.command_log.txt.
This is a hidden file. Use control+h to view it on Linux or command+shift+. to view it on MacOS.
# View command history for the current working directory
cat .command_log.txt

# View last 10 lines
cat .command_log.txt | tail -10
Make a sample_key.csv:#
It should have these columns:
dir_name,condition
sample01,control
sample02,treatment
…
Defining Common Variables for Command Arguments#
To simplify running commands, define common variables in a shell script (e.g., env_var.sh).
For example, $BASE is global variable representing the path to the main experiment folder, a place to aggregate analyses and sample?? folders
Example: $BASE represents the main experiment folder where analyses and sample?? folders (or condition folders with sample?? folders) are stored.
Source the script to load variables in each terminal session
Copy /UNRAVEL/unravel/env_var.sh to your experiment directory and update each variable with a code editor (e.g., VS Code or nano)
Using your editor, add this line to your terminal config file (.bashrc or .zshrc) to easily load variables:
alias exp=". /path/to/env_var.sh" # Update the path. Use a short name for `exp`.
# Reopen the terminal or source your terminal config file to apply changes
. ~/.bashrc  # or . ~/.zshrc

# Run the alias before using commands
exp

# Echo a variable to see its value:
echo $DIRS  # This variable contains a space-separated list of paths to sample?? folders or directories containing them (for batch processing with `-d`)

# Example:
utils_get_samples -d $DIRS  # Finds all sample?? folders in the paths from $DIRS.
Optional: Clean TIFFs#
If raw data is in the form of a tif series, consider running:
utils_clean_tifs -t <path to directories with tifs relative to ./sample?? folders> -m
This will remove spaces from files names and move files other than *.tif to the parent directory
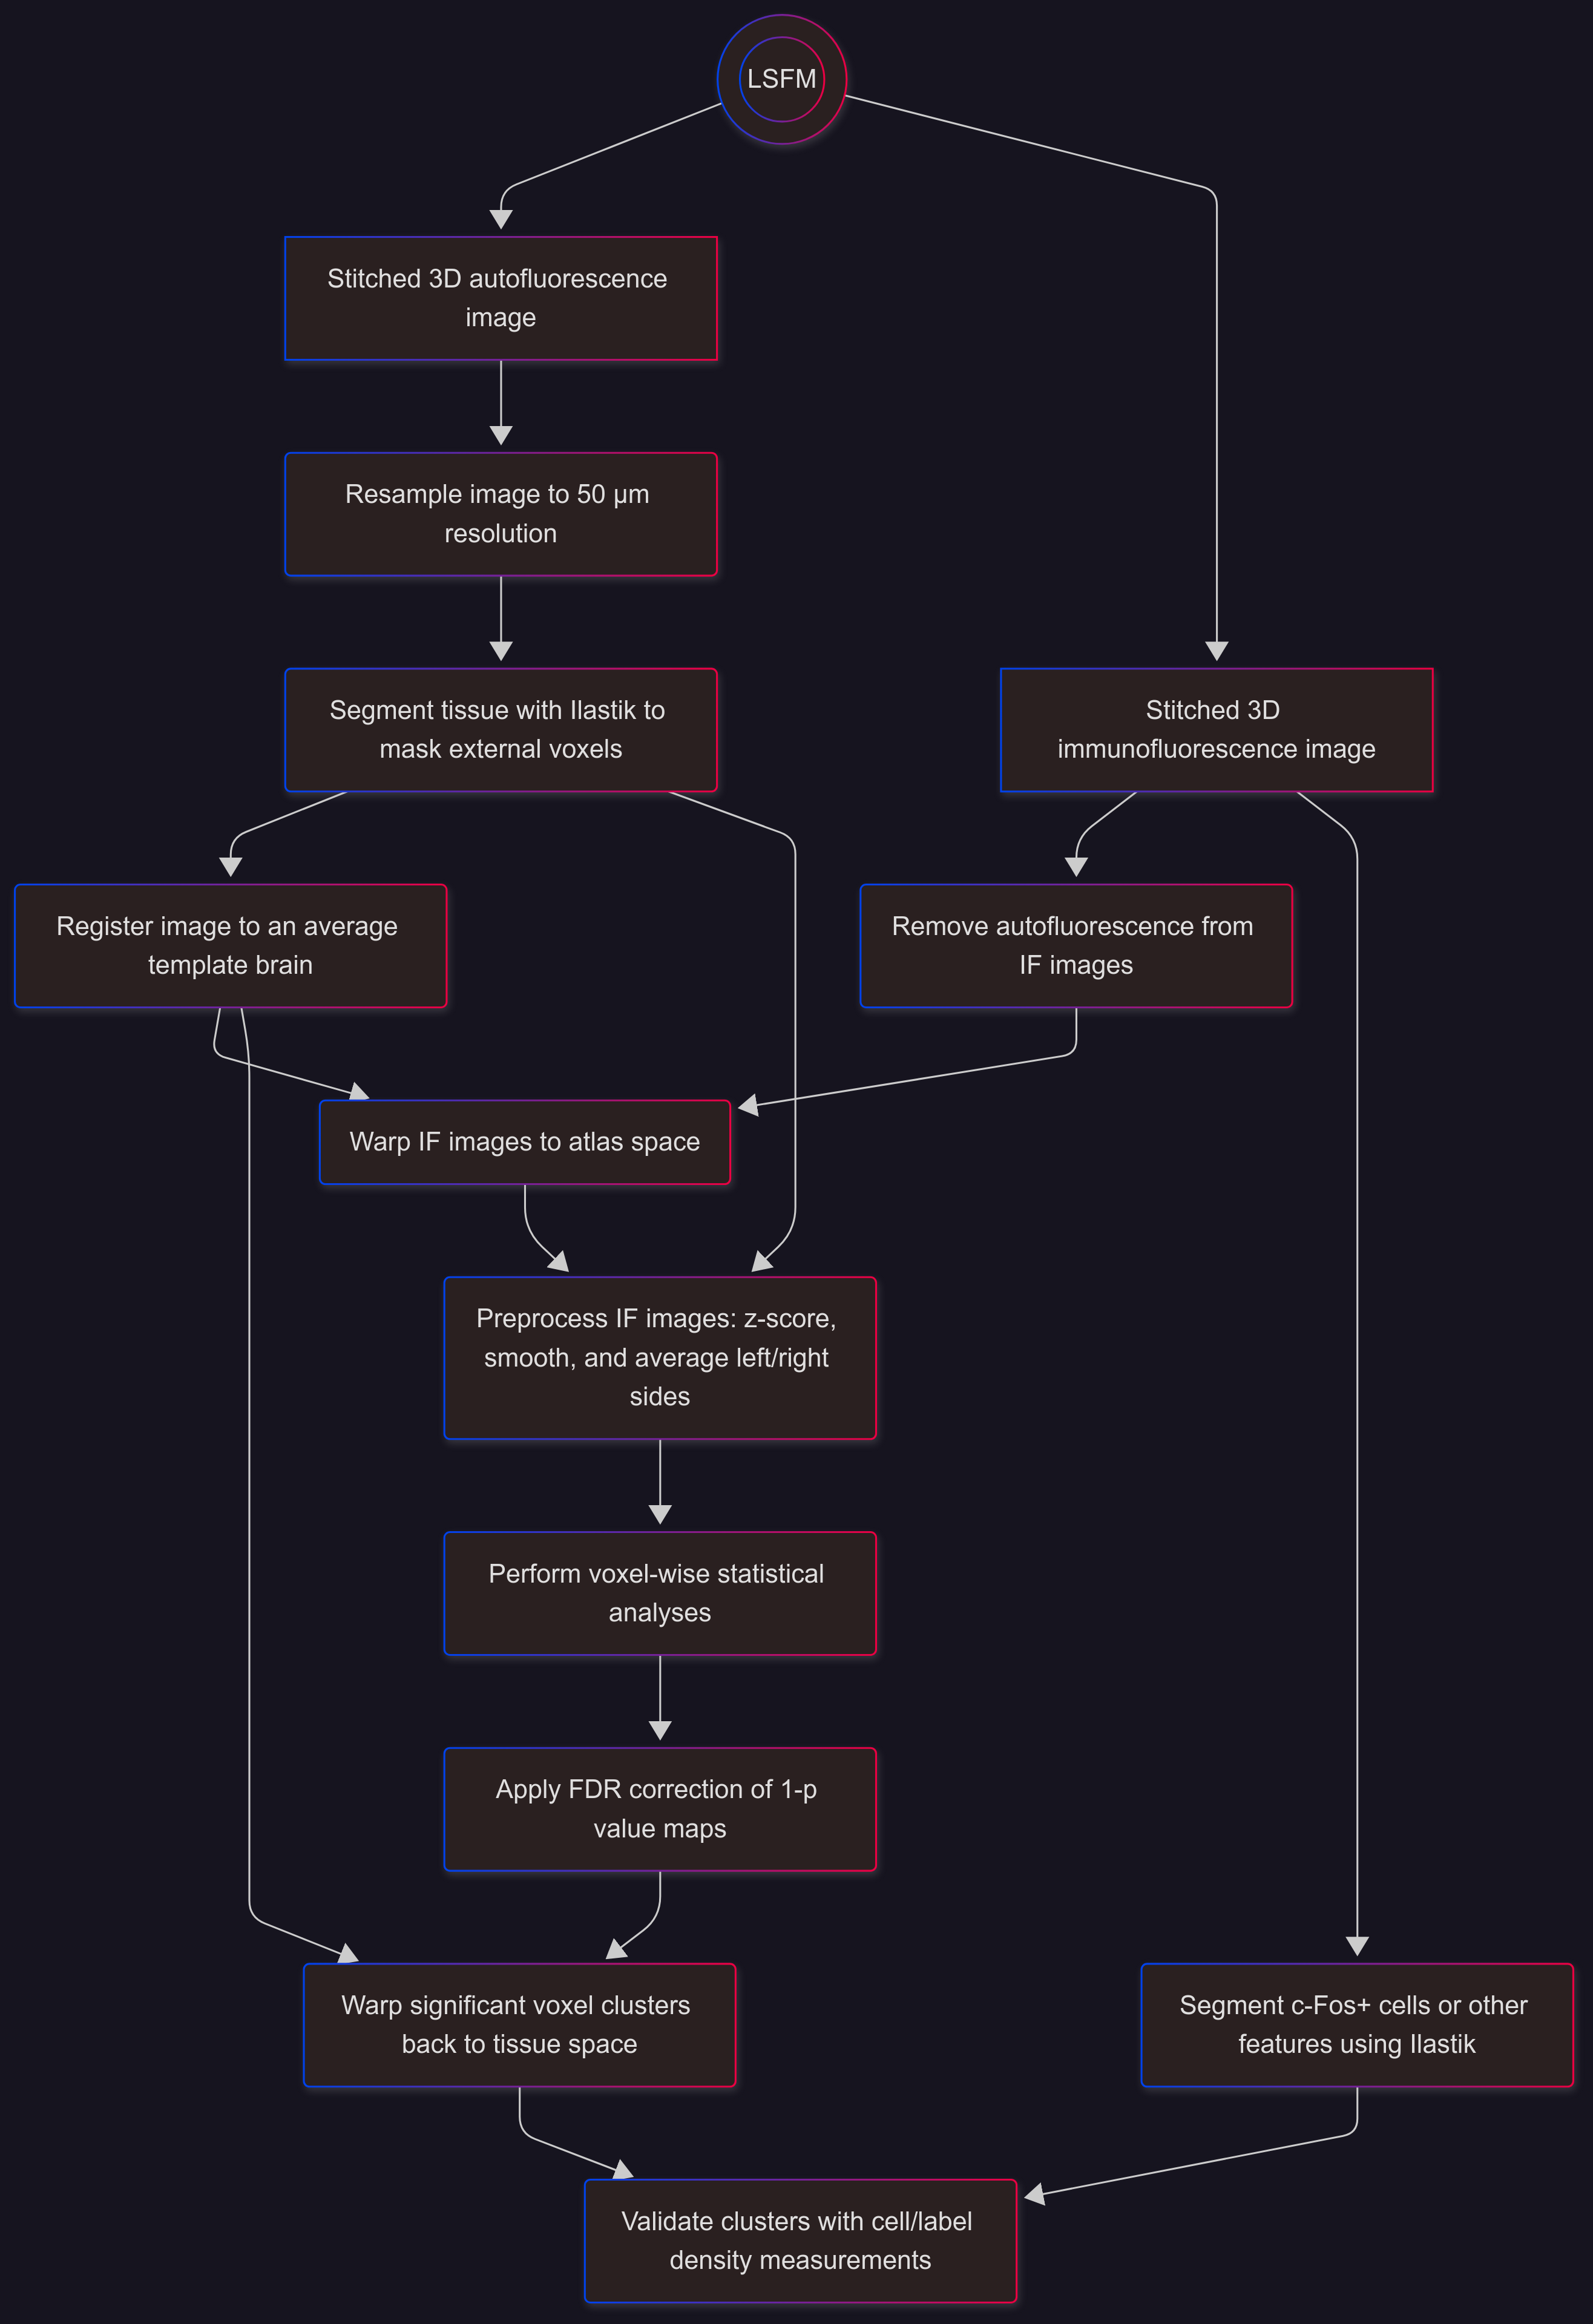
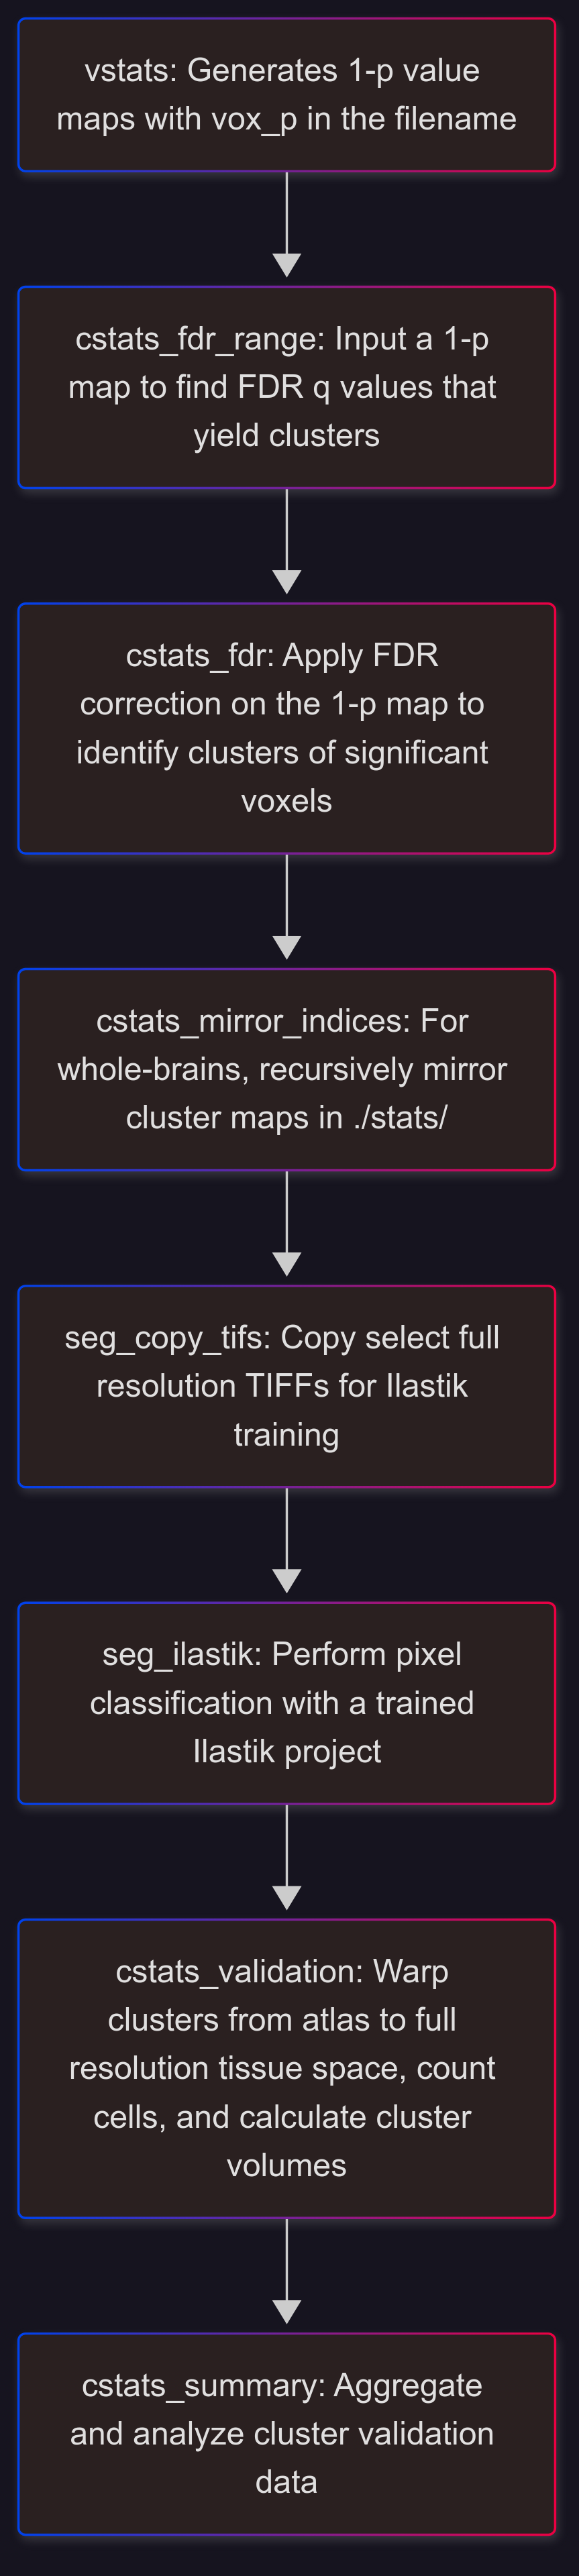
Analysis Overview#
Overview of a typical workflow (voxel-wise analyses followed by cluster validation):
Training Ilastik#
Ilastik has two purposes for our typical workflow:
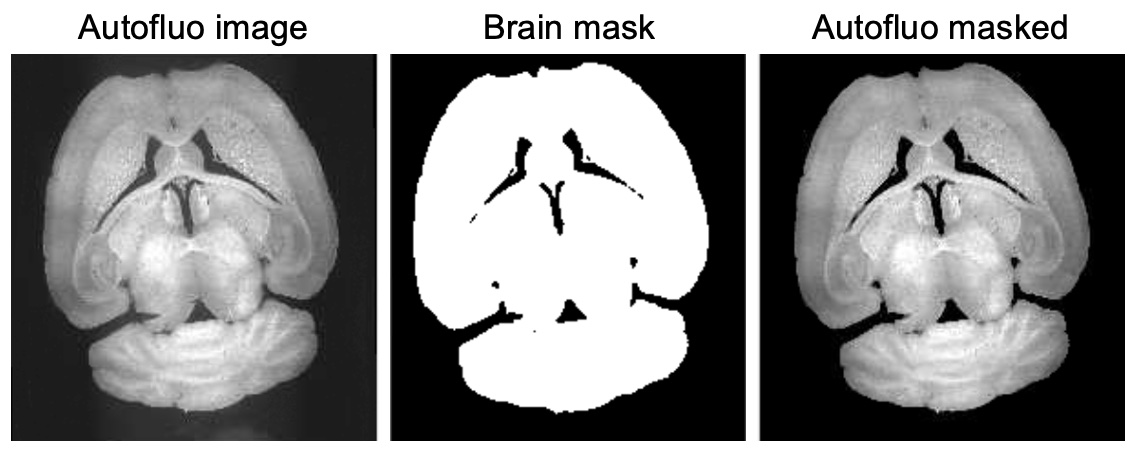
During registration, Ilastik is used to segment tissue, creating brain masks that refine registration of autofluo images and z-scoring of IF images. After training Ilastik, segmentation of 50 µm autolfluo images is automated with seg_brain_mask.
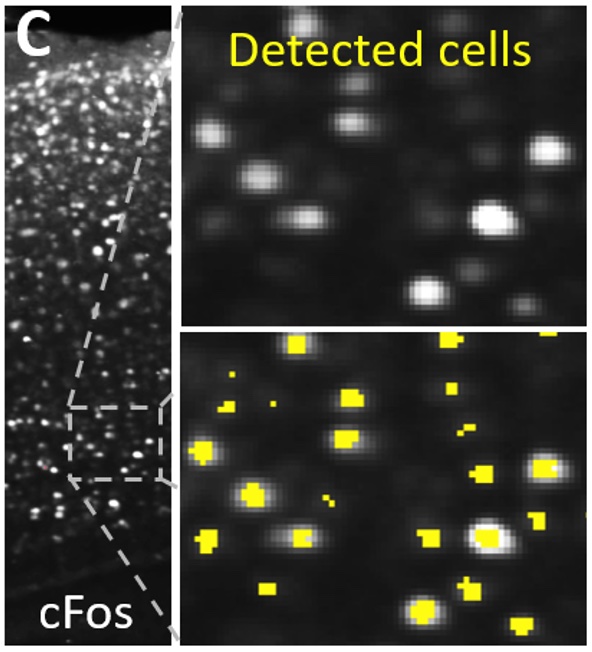
During cluster validation, Ilastik labels c-Fos+ cells or other features of interest for quantification of cell or label densities within clusters from voxel-wise statistics. Segmentation of full-res IF images is automated with seg_ilastik.
Pixel classification documentation
Setting up Ilastik for batch processing
# Add this to your ~/.bashrc or ~/.zshrc terminal config file:
export PATH=/usr/local/ilastik-1.4.0.post1-Linux:$PATH   # Update the path and version

# Optional: add a shortcut command for launching Ilastik via the terminal
alias ilastik=run_ilastik.sh  # run_ilastik.sh could be replaced w/ the full path to the executable file

# Ilastik executable files for each OS:
#     - Linux and WSL: /usr/local/ilastik-1.4.0.post1-Linux/run_ilastik.sh
#     - Mac: /Applications/Ilastik.app/Contents/ilastik-release/run_ilastik.sh
#     - Windows: C:\Program Files\ilastik-1.3.3post3\run_ilastik.bat

# Source your terminal config file for these edits to take effect:
. ~/.bashrc  # Or close and reopen the terminal
Training Ilastik
Launch Ilastik
Either double click on the application or run:
ilastik(if you set up an alias)Select Pixel Classification and choose where to save the project
If using WSL, you may need to save the project to the Windows file system for training Ilastik [e.g., the C drive]. It can be moved to the WSL file system after training.
After saving the project, wait a sec for it to switch to the Input Data step.
Input Data
Gather training slices to a folder from all samples with seg_copy_tifs
Drag and drop training slices into the ilastik GUI (e.g., from a dir w/ 3 slices per sample and > 2 samples per condition)
ctrl+Ato select training slices -> right-click -> Edit shared properties -> Storage: Copy into project file -> Ok
Feature Selection
Select Features… -> select all features (
control+a) or an optimized subset (faster but less accurate).Optional: to find an optimal subset of features, select all features, train Ilastik, turn off Live Updates, click Suggest Features, select a subset, and refine training.
Training
Brightness/contrast: select the gradient button and click and drag in the image (faster if zoomed in)
Zoom:
control/command + mouse wheel scroll,control/command + 2 finger scroll, or-and+(i.e.,shift + =)Pan:
shift+left click and dragorclick mouse wheel and dragWith
label 1and thebrush toolselected, paint on c-Fos+ cells or another feature of interestWith
label 2and thebrush toolselected, paint on the background (e.g., any pixel that is not a cell)Turn on
Live Updateto preview pixel classification (faster if zoomed in) and refine training (e.g., if some cells are classified as background, paint more cells with label 1).swill toggle the segmentation on and off.pwill toggle the prediction on and off.Toggle eyes to show/hide layers and/or adjust transparency of layers.
Change
Current Viewto see other training slices. Check segmentation for these and refine as needed.Save the project in the experiment summary folder and close if using this script to run ilastik in headless mode for segmenting all images.
Segment immunofluo images to segment c-Fos+ cells or other features
Notes
If you want to go back to steps 1 & 2, turn Live Updates off
It is possible at add extra labels with
a(e.g., if you want to segment somata with one label and axons with another label)If you accidentally press
a, turn off Live Updates and pressxnext to the extra label to delete it.If the segmentation for label 1 fuses neighboring cells, draw a thin line in between them with label 2.
Registration#

io_metadata#
Extract or specify x and z voxel sizes in microns (saves to ./sample??/parameters/metadata.txt).
You can add these resolutions to env_var.sh as global variables (e.g., $XY and $Z) and load them before running commands with:
source path/to/env_var.shFor batch processing, run the io_metadata command from a directory containing sample?? folders, within a sample?? folder, or use -d to pass in a list of paths to sample folders or directories containing sample folders.
# To specify x and z voxel sizes in microns, use the -x and -z flags.
io_metadata -i <path to image or directory with TIFFs relative to sample??/> -x $XY -z $Z [-d $DIRS] # Remove square brackets from optional arguments
# If env_var.sh is not used, pass in the voxel sizes like this: -x 3.5232 -z 6.

# If -x and -z are omitted, io_metadata will attempt to extract this information from the image metadata.
io_metadata -i <rel_path/full_res_img> [-d $DIRS]
# 'rel_path' refers to the relative path from within the sample?? folders.
# Glob patterns can be used for -i (e.g., *.czi).
reg_prep#
Prepare autofluorescence images for registration (resample them to 50 µm isotropic resolution and save to ./sample??/reg_inputs/)
reg_prep -i <rel_path/image> [-d $DIRS] # -i options: tif_dir, .czi, .h5, .zarr, or .tif (e.g., *.czi)
# If using *.czi, by default the first channel is used (--channel 0), since that is usually the autofluo channel
seg_copy_tifs#
Copy resampled autofluo .tif files from each sample for making a brain mask with ilastik
In the example below -s 0000 0005 0050 means that the 1st, 6th, and 51st tif will be copied to the target directory
The target directory is the current working directory unless -td is used to specify an output path.
seg_copy_tifs -i reg_inputs/autofl_??um_tifs -s 0000 0005 0050 [-td brain_mask] [-d $DIRS]
Train Ilastik to segment autofluo tissue to make a brain mask
seg_brain_mask#
Makes reg_inputs/autofl_??um_brain_mask.nii.gz and reg_inputs/autofl_??um_masked.nii.gz for
reg
seg_brain_mask -ie <path/ilastik_executable> -ilp <path/trained_ilastik_project.ilp> [-d $DIRS]
Making the autofluorescence image better match the average template image
seg_brain_mask zeros out voxels outside of the brain. This prevents the average template (moving image) from being pulled outward during registration (reg).
If non-zero voxles outside the brain remain and are affecting reg quality, use 3D slicer to zero them out by painting in 3D (segmentation module).
If there is missing tissue, use 3D slicer to fill in gaps.
reg#
Register an average template brain/atlas to a resampled autofluo brain.
Determining the 3 letter orientation code
Letter options:
A/P=Anterior/Posterior
L/R=Left/Right
S/I=Superior/Interior
Letter order:
The side of the brain at the positive direction of the x, y, and z axes determines the 3 letters
Letter 1: Side of the brain right of z-stack
Letter 2: Side of the brain facing bottom of z-stack
Letter 3: Side of the brain facing back of z-stack
reg -m <path/template.nii.gz> -bc -sm 0.4 -ort <3 letter orientation code> -m2 <path/atlas_CCFv3_2020_30um.nii.gz> [-d $DIRS]

# Example if using env_var.sh (assuming an RPS orientation):
reg -m $TEMPLATE -bc -sm 0.4 -ort RPS -m2 $ATLAS -d $DIRS

# -bc performs N4 bias field correction to make image intensities more uniform
# -sm smooths the autofluo image by the amount specified
# If you want to use an unmasked autofluo image, provide: -mas None -f reg_inputs/autofl_50um.nii.gz. Other commands alos assume that a masked autofluo image was used, so check each help guide for default arguments.
If sample orientations vary
Make a ./sample??/parameters/ort.txt with the 3 letter orientation for each sample and run:
for d in $DIRS ; do cd $d ; for s in sample?? ; do reg -m $TEMPLATE -bc -sm 0.4 -ort $(cat $s/parameters/ort.txt) -m2 $ATLAS -v -d $PWD/$s ; done ; done
reg_check#
Check registration by copying these images from each sample??/reg_ouputs folder to a target directory:
autofl_??um_masked_fixed_reg_input.nii.gz
atlas_in_tissue_space.nii.gz
The original reg_inputs/autofl_50um.nii.gz can also be copied to the target dir to check for overmasking.
reg_check [-td reg_results] [-d $DIRS]  # Default for -td: copy images to the current dir.
# The default warped atlas from reg is atlas_CCFv3_2020_30um_in_tissue_space.nii.gz (in ./sample??/.reg_outputs). Use -wa <image_name.nii.gz> to set this.
View these images with
reg_check_fsleyes, which launches FSLeyes docsFSLeyes might not work in Windows without additional set up: Installation on Windows
Checking registration with FSLeyes
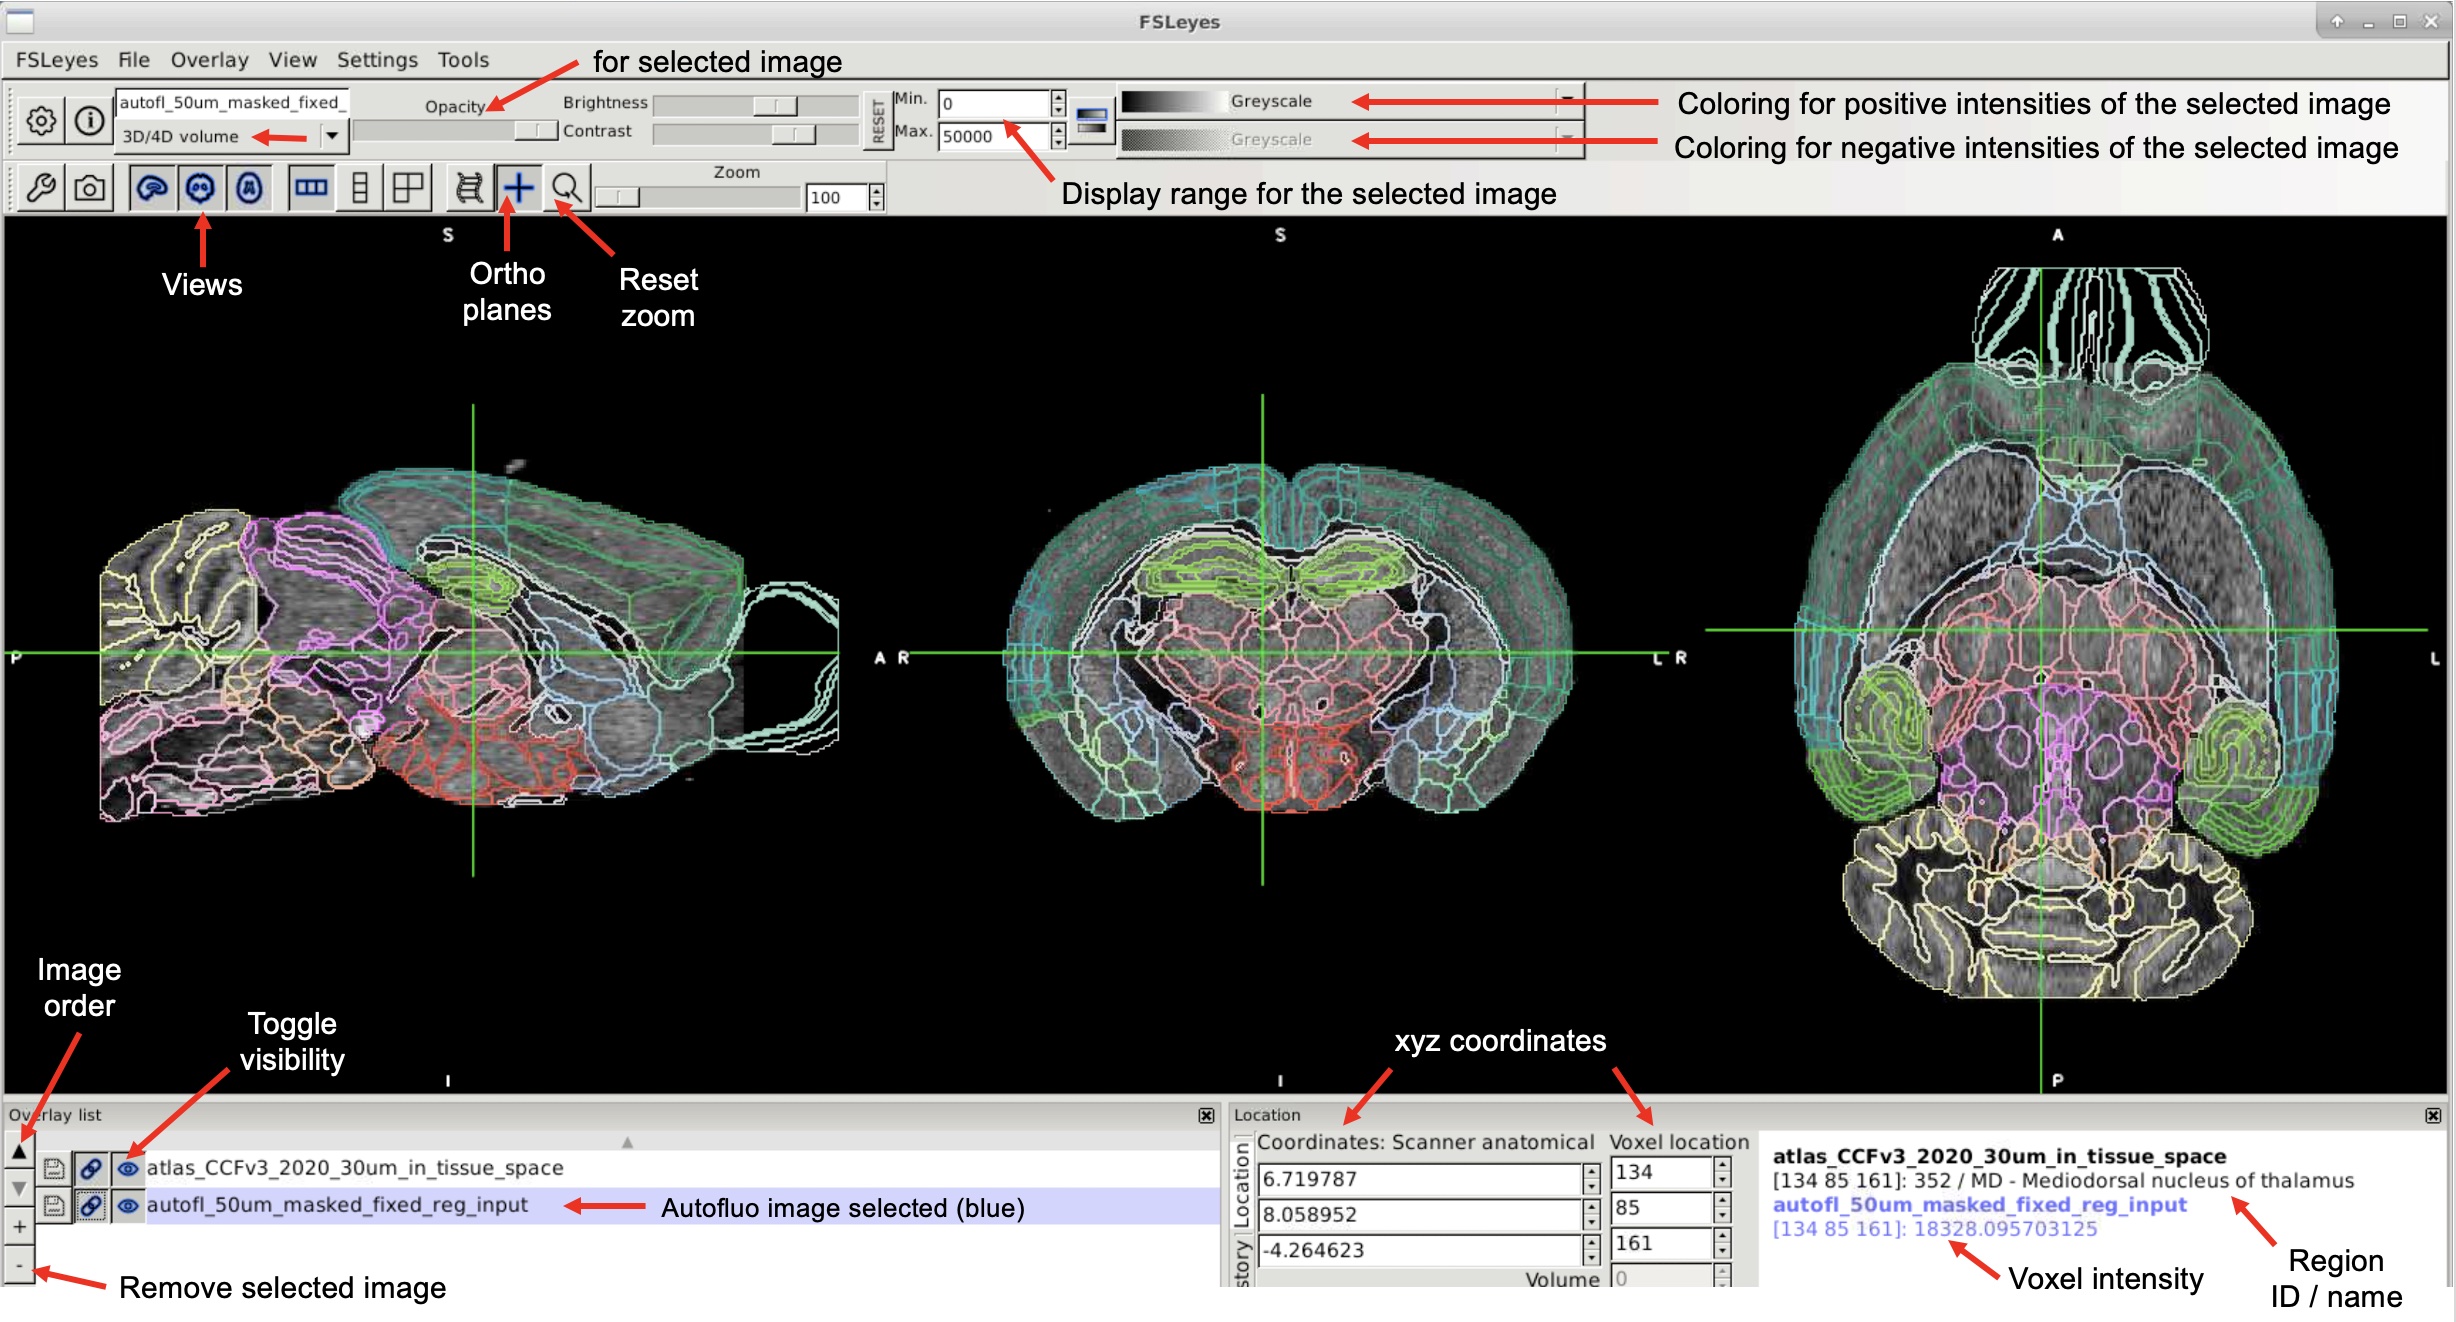
Use FSLeyes to view the autofluo image from reg (sample??/reg_ouputs/autofl_50um_masked_fixed_reg_input.nii.gz).#

Use FSLeyes to view the atlas warped to the the tissue (sample??/reg_ouputs/atlas_CCFv3_2020_30um_in_tissue_space.nii.gz)#
Setting up Allen brain atlas coloring in FSLeyes
Download the ccfv3_2020.lut look up table for atlas coloring and region annotation.
Or access it from the GitHub repo clone:
UNRAVEL/_other/fsleyes_luts/ccfv3_2020.lutAdd
ccfv3_2020.lutto the following location:Linux:
/home/<your_username>/.config/fsleyes/luts/ccfv3_2020.lutMacOS:
/usr/local/fsl/fslpython/envs/fslpython/lib/python3.8/site-packages/fsleyes/assets/luts/ccfv3_2020.lutWindows:
C:\Users\<your_username>\AppData\Roaming\fsleyes\luts\ccfv3_2020.lut
On MacOS, run the following command to add write permissions to the LUT folder:
sudo chmod a+w /usr/local/fsl/fslpython/envs/fslpython/lib/python3.8/site-packages/fsleyes/assets/luts
On MacOS, edit
order.txtto includeccfv3_2020.lut.To remove other LUTs, move them up a directory level, but keep
random.lutin place.Open
atlas_CCFv3_2020_30um.nii.gzin FSLeyes.Select the atlas and change “3D/4D volume” to “Label image.”
Switch the lookup table from
randomtoccfv3_2020.Click the circle icon at the top to convert the atlas to a wireframe view.
If you don’t want to select the LUT every time, make a copy of
random.lutand replace its contents with those ofccfv3_2020.lut.
Voxel-wise Statistics#

vstats_prep#
unravel.voxel_stats.vstats_prep
Preprocess immunofluo images and warp them to atlas space for voxel-wise statistics.
# Example with rolling ball background subtration (pixel radius of 4):
vstats_prep -i cfos -o cFos_rb4_atlas_space.nii.gz -rb 4 -a $ATLAS [-d $DIRS]

# Usage:
vstats_prep -i <rel_path/image> -o cFos_rb4_atlas_space.nii.gz -a $ATLAS [-sa 3] [-rb 4] [--channel 1] [-d $DIRS]
# --channel is for .czi images (1 is the second channel)
Info on background subtraction
Removing autofluorescence from immunolabeling improves the sensitivity of voxel-wise comparisons.
Use -sa 3 for 3x3x3 spatial averaging if there is notable noise from voxel to voxel.
Use -rb for rolling ball background subtraction.
Use a smaller rolling ball radius if you want to preserve punctate signal like c-Fos+ nuclei (e.g., 4)
Use a larger rolling ball radius if you want to preserve more diffuse signal (e.g., 20).
The radius should be similar to the largest feature that you want to preserve.
You can test parameters for background subtraction with:
-
Copy a tif to a test dir for this (e.g., with
seg_copy_tifs)Use
unravel.image_io.io_img_convertto create a tif series
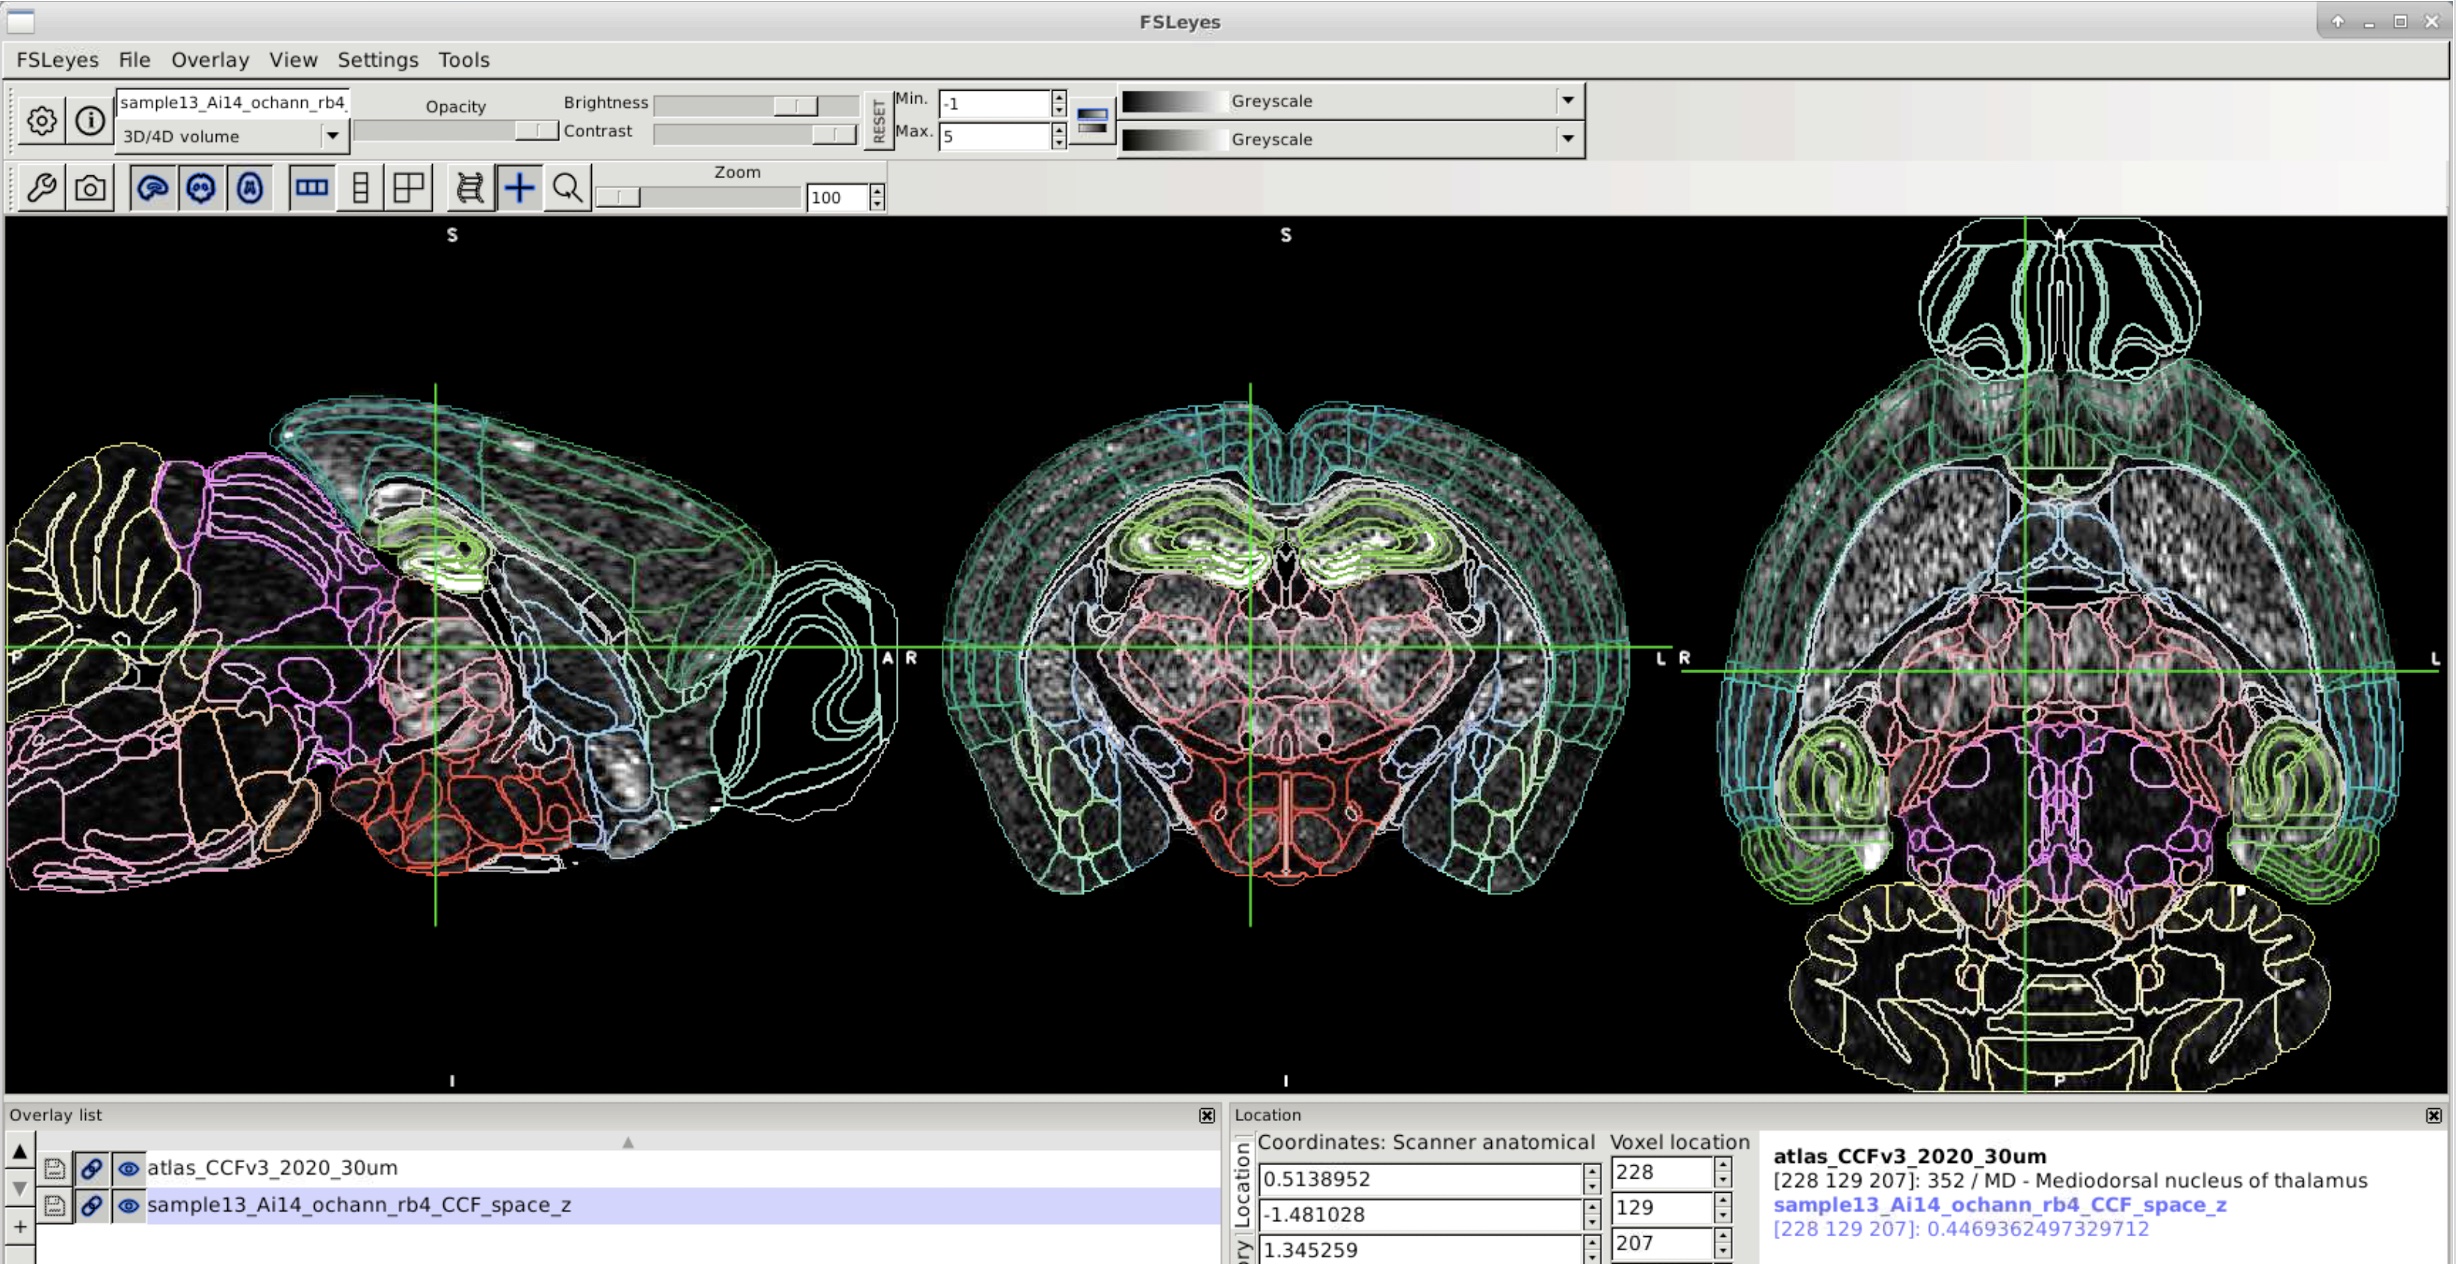
Use FSLeyes to view the fluorescently labeled image in atlas space.#
vstats_z_score#
Z-score atlas space images using tissue masks (from brain_mask) and/or an atlas mask.
# Z-scoring using the brain mask (-i and -tmas paths are relative to the sample?? folder)
vstats_z_score -i atlas_space/sample??_cFos_rb4_atlas_space.nii.gz [-d $DIRS]

# Z-scoring using an atlas mask
vstats_z_score -i 'atlas_space/*.nii.gz' -amas $MASK [-d $DIRS]

# Using a tissue mask and an atlas mask
vstats_z_score -i 'atlas_space/*.nii.gz' -tmas reg_inputs/autofl_50um_brain_mask.nii.gz -amas $MASK [-d $DIRS]

# Alternatively, use `vstats_z_score_cwd` to z-score images in the current working directory
vstats_z_score_cwd -mas $MASK
utils_agg_files#
unravel.utilities.aggregate_files_from_sample_dirs
Aggregate pre-processed immunofluorescence (IF) images for voxel-wise stats
utils_agg_files -i atlas_space/*_cFos_rb4_atlas_space_z.nii.gz [-td path/target_dir] [-d $DIRS]
vstats_whole_to_avg#
unravel.voxel_stats.whole_to_LR_avg
Smooth and average left and right hemispheres together
# Run this in the folder with the .nii.gz images to process
vstats_whole_to_avg -k 0.1 --parallel -v  # A 0.05 mm - 0.1 mm kernel radius is recommended for smoothing

# Process all *.nii.gz files in the current directory with no smoothing:
vstats_whole_to_avg [-tp] [-amas $MASK] # Provide -tp for parallel processing.

# Process files matching the pattern with smoothing:
vstats_whole_to_avg -i '*_cFos_rb4_atlas_space_z.nii.gz.nii.gz' -k 0.1 [-tp] [-amas $MASK]
# A 0.1 mm kernel radius is recommended for smoothing (-k)
See also
Setting up voxel-wise stats
Create a vstats folder and subfolders for each analysis:
Name subfolders succinctly (this name is added to other folder and file names).
Generate and add .nii.gz files to vstats subfolders:
Input images are from
vstats_prepand may have been z-scored withvstats_z_scoreorvstats_z_score_cwd(we z-score c-Fos labeling as intensities are not extreme)For bilateral data, left and right sides can be averaged with
vstats_whole_to_avg(then use a unilateral hemisphere mask forvstatsandcstats_fdr).We smooth data (e.g., with a 100 µm kernel) to account for innacuracies in registration
This can be performed with
vstats_whole_to_avgorvstats
Prepend filenames with a one word condition (e.g.,
drug_sample01_atlas_space_z.nii.gz).Camel case is ok for the condition.
utils_prependcan add conditions to filenames.Group order is alphabetical (e.g., drug is group 1 and saline is group 2).
View the images in FSLeyes to ensure they are aligned with the atlas and the sides are correct.
Other .nii.gz images unrelated to voxel-wise analyses should be excluded from the vstats subfolder.
Determine Analysis Type:
If there are 2 groups,
vstatsmay be used after pre-processing.If there are more than 2 groups, prepare for an ANOVA as described below
vstats Outputs
T-test outputs:
vox_p_tstat1.nii.gz: Uncorrected p-values for tstat1 (group 1 > group 2).vox_p_tstat2.nii.gz: Uncorrected p-values for tstat2 (group 1 < group 2).
ANOVA outputs:
vox_p_fstat1.nii.gz: Uncorrected p-values for fstat1 (1st contrast, e.g., drug vs. saline).vox_p_fstat2.nii.gz: Uncorrected p-values for fstat2 (2nd contrast, e.g., context1 vs. context2).vox_p_fstat3.nii.gz: Uncorrected p-values for fstat3 (3rd contrast, e.g., interaction).
Example: Preparing for an ANOVA
Setup Design Matrix:
For an ANOVA, create
./vstats/vstats_dir/stats/design/.Open terminal from
./statsand run:fsl.Navigate to
Misc -> GLM Setup.
GLM Setup Window:
Select
Higher-level / non-timeseries design.Set
# inputsto the total number of samples.
EVs Tab in GLM Window:
Set
# of main EVsto 4.Name EVs (e.g.,
EV1 = group 1).Set Group to 1 for all.
Design Matrix:
Under
EV1, enter 1 for each subject in group 1 (1 row/subject). EV2-4 are 0 for these rows.Under
EV2, enter 1 for each subject in group 2, starting with the row after the last row for group 1.Follow this pattern for EV3 and EV4.
Contrasts & F-tests Tab in GLM Window:
Set
# of Contraststo 3 for a 2x2 ANOVA:C1:Main_effect_<e.g.,drug>1 1 -1 -1 (e.g., EV1/2 are drug groups and EV3/4 are saline groups).C2:Main_effect_<e.g., context>1 -1 1 -1 (e.g., EV1/3 were in context1 and EV2/4 were in context2).C3:Interaction1 -1 -1 1.
Set
# of F-teststo 3:F1: Click upper left box.F2: Click middle box.F3: Click lower right box.
Finalize GLM Setup:
In the GLM Setup window, click
Save, then clickdesign, and clickOK.
Run Voxel-wise Stats:
From the vstats_dir, run:
vstats.
Background on FSL’s Randomise Tool
vstats#
Run voxel-wise stats using FSL’s randomise_parallel command
Outputs saved in stats/
# Run this in the folder with the input IF images (the current directory name will be prepended to outputs)
vstats -mas $MASK -a $ATLAS [-p 18000] [-k 0.1]
# -p sets the number of permutations.
# -k is for smoothing if inputs have not yet been smoothed (-k is the kernel size in mm)
# See the vstats help for providing additional arguments to FSL's randomise_parallel
Outputs from voxel-wise stats
Outputs in ./stats/
vox_p maps are uncorrected 1-p value maps
tstat1: group1 > group2
tstat2: group2 > group1
fstat*: f contrast w/ ANOVA design (non-directional p value maps)
fstat1 corresponds to the first Contrast defined in step 5 above.
Cluster-wise Statistics#
False Discovery Rate (FDR) Correction#
cstats_fdr_range#
unravel.cluster_stats.fdr_range
Outputs a list of FDR q values that yield clusters.
cstats_fdr_range -i <path/vox_p_tstat1.nii.gz> -mas $MASK
cstats_fdr#
Perform FDR correction on a 1-p value map to define clusters
Outputs are saved to a new folder in stats/ named after the input image and q value
cstats_fdr -i <path/vox_p_tstat1.nii.gz> -mas $MASK -q 0.05 0.01 0.001 [-ms 100]
# For -q, copy the output from cstats_fdr_range
# For -ms, set the number of voxels for a cluster (e.g., 100 for c-Fos or 400 if labeling is sparse)

# Perform FDR correction on multiple directional 1-p value maps
for j in *_vox_p_*.nii.gz ; do q_values=$(cstats_fdr_range -mas $MASK -i $j) ; cstats_fdr -mas $MASK -i $j -q $q_values ; done

# ANOVAs output non-directioanl 1-p value maps. Optionally convert them into a directional cluster index:
q_values=$(cstats_fdr_range -i vox_p_fstat1.nii.gz -mas $MASK) ; cstats_fdr -i vox_p_fstat1.nii.gz -mas $MASK -o fstat1 -v -a1 Control_avg.nii.gz -a2 Deep_avg.nii.gz -q $q_values
# Make averaged images for each group (-a1 and -a2 args) with the img_avg command
cstats_mirror_indices#
unravel.cluster_stats.recursively_mirror_rev_cluster_indices
Recursively flip the content of rev_cluster_index.nii.gz images (to validate w/ clusters in left and right hemispheres)
Run this in the ./stats/ folder to process all subdirs with reverse cluster maps (cluster IDs go from large to small)
# Use -m RH if a right hemisphere mask was used (otherwise use -m LH)
cstats_mirror_indices -m RH [-i glob_pattern]
Segmentation of Full-Resolution Fluorescence Images#
1) seg_copy_tifs#
Copy or extract full res tif files to a target dir for training Ilastik to segment labels of interest
Tip
Copy/extract 3 slices from each sample, with at least 3 samples per condition.
seg_copy_tifs -i <rel_path/raw_image> -s 0100 0500 1000 [-td ilastik_segmentation] [-d $DIRS]
# Default for target dir (-td) is current dir
# The name of the dir with full-res tifs can be passed in for -i
2) Train Ilastik to segment c-Fos+ cells or other features#
3) seg_ilastik#
unravel.segment.ilastik_pixel_classification
Segment features of interest (e.g., c-Fos+ cells) in full-resulution images using a trained Ilastik project (pixel classification)
seg_ilastik -ie <path/ilastik_executable> -ilp <path/ilastik_project.ilp> -i <rel_path to tif_dir or image> -o seg_dir --labels 1 [--rm_out_tifs] [--channel 1] [-d $DIRS]
# --labels is a space-separated list of labels to convert into binary .nii.gz images.
# --channel is for .czi images (1 is the second channel)
Cluster Validation and Statistics#

cstats_validation#
unravel.cluster_stats.validation
Warps cluster index from atlas space to tissue space, crops clusters, applies segmentation mask, and quantifies cell or label densities
# Cell density measurements in all clusters
cstats_validation -m <path/rev_cluster_index_to_warp_from_atlas_space.nii.gz> -s  <rel_path/seg_img.nii.gz> [-d $DIRS]

# Label density measurements in select clusters
cstats_validation -m <path/rev_cluster_index_to_warp_from_atlas_space.nii.gz> -s  <rel_path/seg_img.nii.gz> -de label_density -c 1 3 4 [-d $DIRS]

# Use -n to save the cluster map in tissue space (-n rel_path/native_cluster_index.zarr). Slower than w/o saving.
# -inp nearestNeighbor is default, but for smoother clusters use multiLabel (slower)

# Processing multiple FDR q value thresholds and both hemispheres (assumes that cstats_mirror_indices has been run):
for q in 0.005 0.01 0.05 0.1 ; do for side in LH RH ; do cstats_validation  -m path/vstats/contrast/stats/contrast_vox_p_tstat1_q${q}/contrast_vox_p_tstat1_q${q}_rev_cluster_index_${side}.nii.gz -s rel_path/seg_img.nii.gz [-d $DIRS] ; done ; done
cstats_summary#
Aggregates and analyzes cluster validation data from
cstats_validationUpdate parameters in /UNRAVEL/unravel/cstats/cluster_summary.ini and save it with the experiment
group1 and group2 must match conditions in the sample_key.csv
# Usage if running directly after ``cstats_validation``
cstats_summary -c <path/cluster_summary.ini> -cvd 'psilocybin_v_saline_tstat1_q*' -vd <path/vstats_dir> -sk $SAMPLE_KEY --groups <group1> <group2> -hg <higher_group> [-d $DIRS]

# Usage if running after ``cstats_validation`` and ``cstats_org_data``:
cstats_summary -c <path/cluster_summary.ini> -sk $SAMPLE_KEY  --groups <group1> <group2> -hg <higher_group> [-d $DIRS]

# See the help guide for cstats_validation if you want to pool data using condition prefixes
Sunburst Plots#
Sunburst plots of regional volumes
CSVs for making sunburst plots are output by
cstats_validationfor each valid cluster map.Output location: main_experiment_dir/cstats/<vstats_contrast>_q
/_valid_clusters/valid_clusters_sunburst.csv Or sunburst CSVs can be generated using
cstats_sunburstSunburst CSVs can be copy and pasted into the sunburst plot tool of the Flourish web app
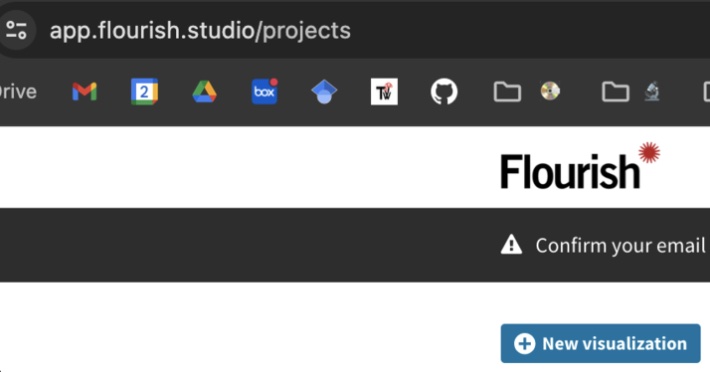
Make a free account w/ Flourish.
Login.
Select “New visualization”.
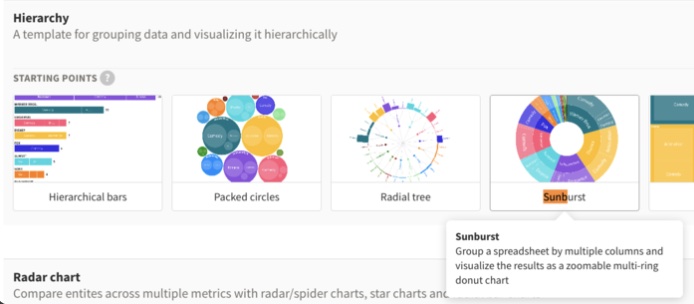
Under “Hierarchy” select “Sunburst”#

Select the “Data” tab.
Set it up like this with columns A-K. Categories/nesting: B-J, Size by: K.
Always delete the entirety of the columns before pasting in values.
Paste in values for columns A-K from a *_sunburst.csv.
Switch to the “Preview” tab to view the plot.

Paste the contents of sunburst_RGBs.csv into Colors –> Custom overrides.
Location: UNRAVEL/unravel/core/csvs/sunburst_RGBs.
cstats_sunburstcan output it w/-rgb.Set Min font size under “Labels” to 0.5 to show labels.
Increase Min font size above the Max size to hide them.
Take a screenshot of the plot to save it.
3D Brain Models#
Visualize cluster maps, etc. in a 3D brain
Files for making 3D brains in DSI Studio are output by
cstats_validationfor each valid cluster map.Output location: main_experiment_dir/cstats/3D_brains/
Alternate location: main_experiment_dir/cstats/
_q /_valid_clusters/
Output image:
_q _rev_cluster_index__valid_clusters_ABA_WB.nii.gz
Output look up table:
_q _rev_cluster_index__valid_clusters_rgba.txt
These files can be generated with
cstats_brain_model(use -m for a bilateral representation of a unilateral map)
Visualization in DSI Studio
Open DSI studio
Click on “Step T3”
Change the drop down to select all files and select the binary atlas (mask_CCFv3_2020_30um.nii.gz)
If you open the binary atlas in the 3D_brains folder, it is easier to open other files from there later
Make it visible: Slices –> Add Isosurface –> Full –> OK –> Zoom out (mouse wheel or 2 finger scroll)
Display settings
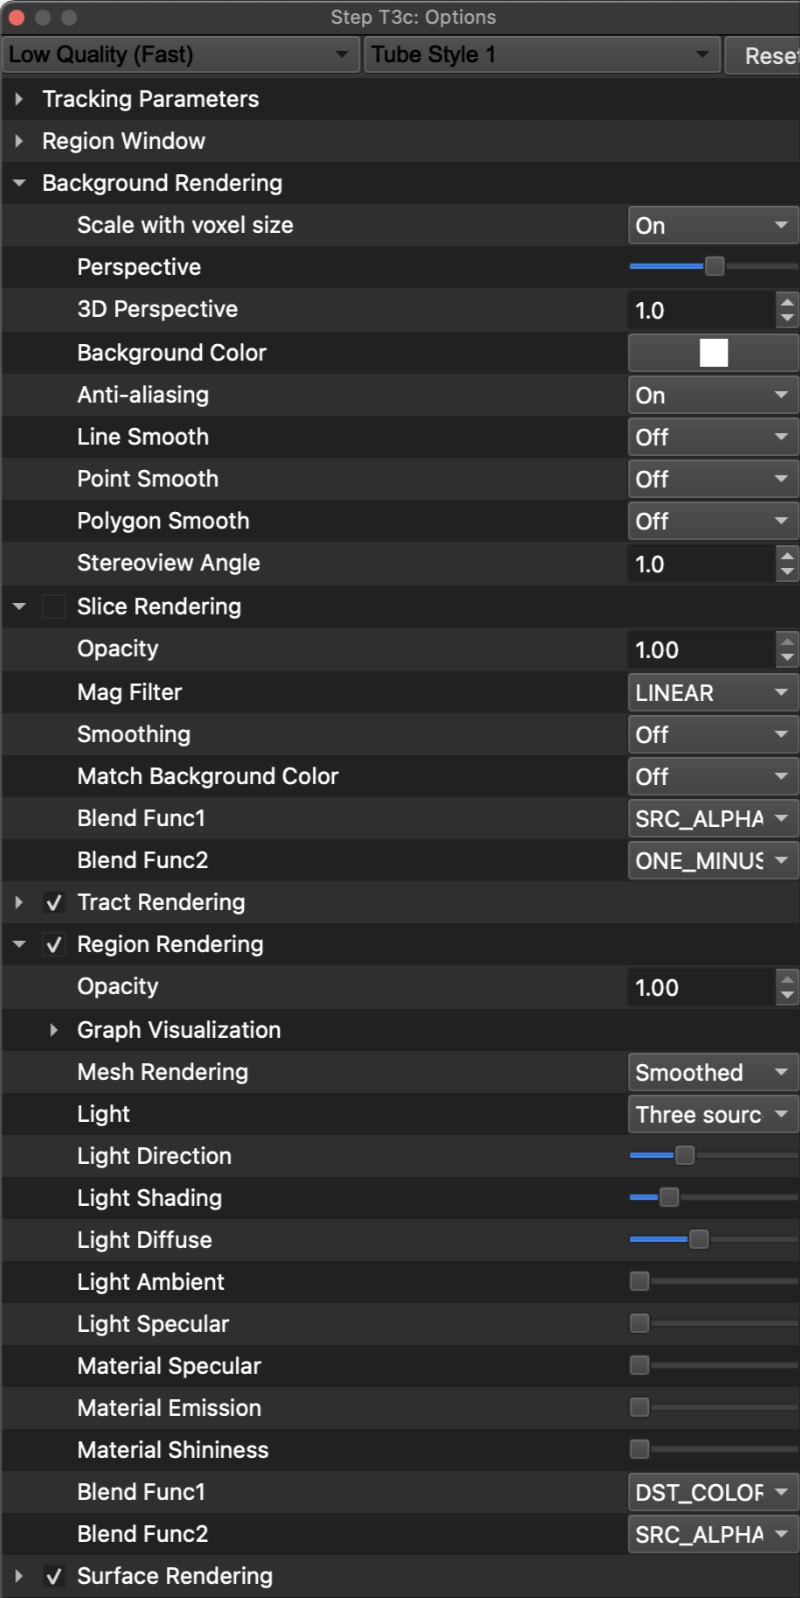
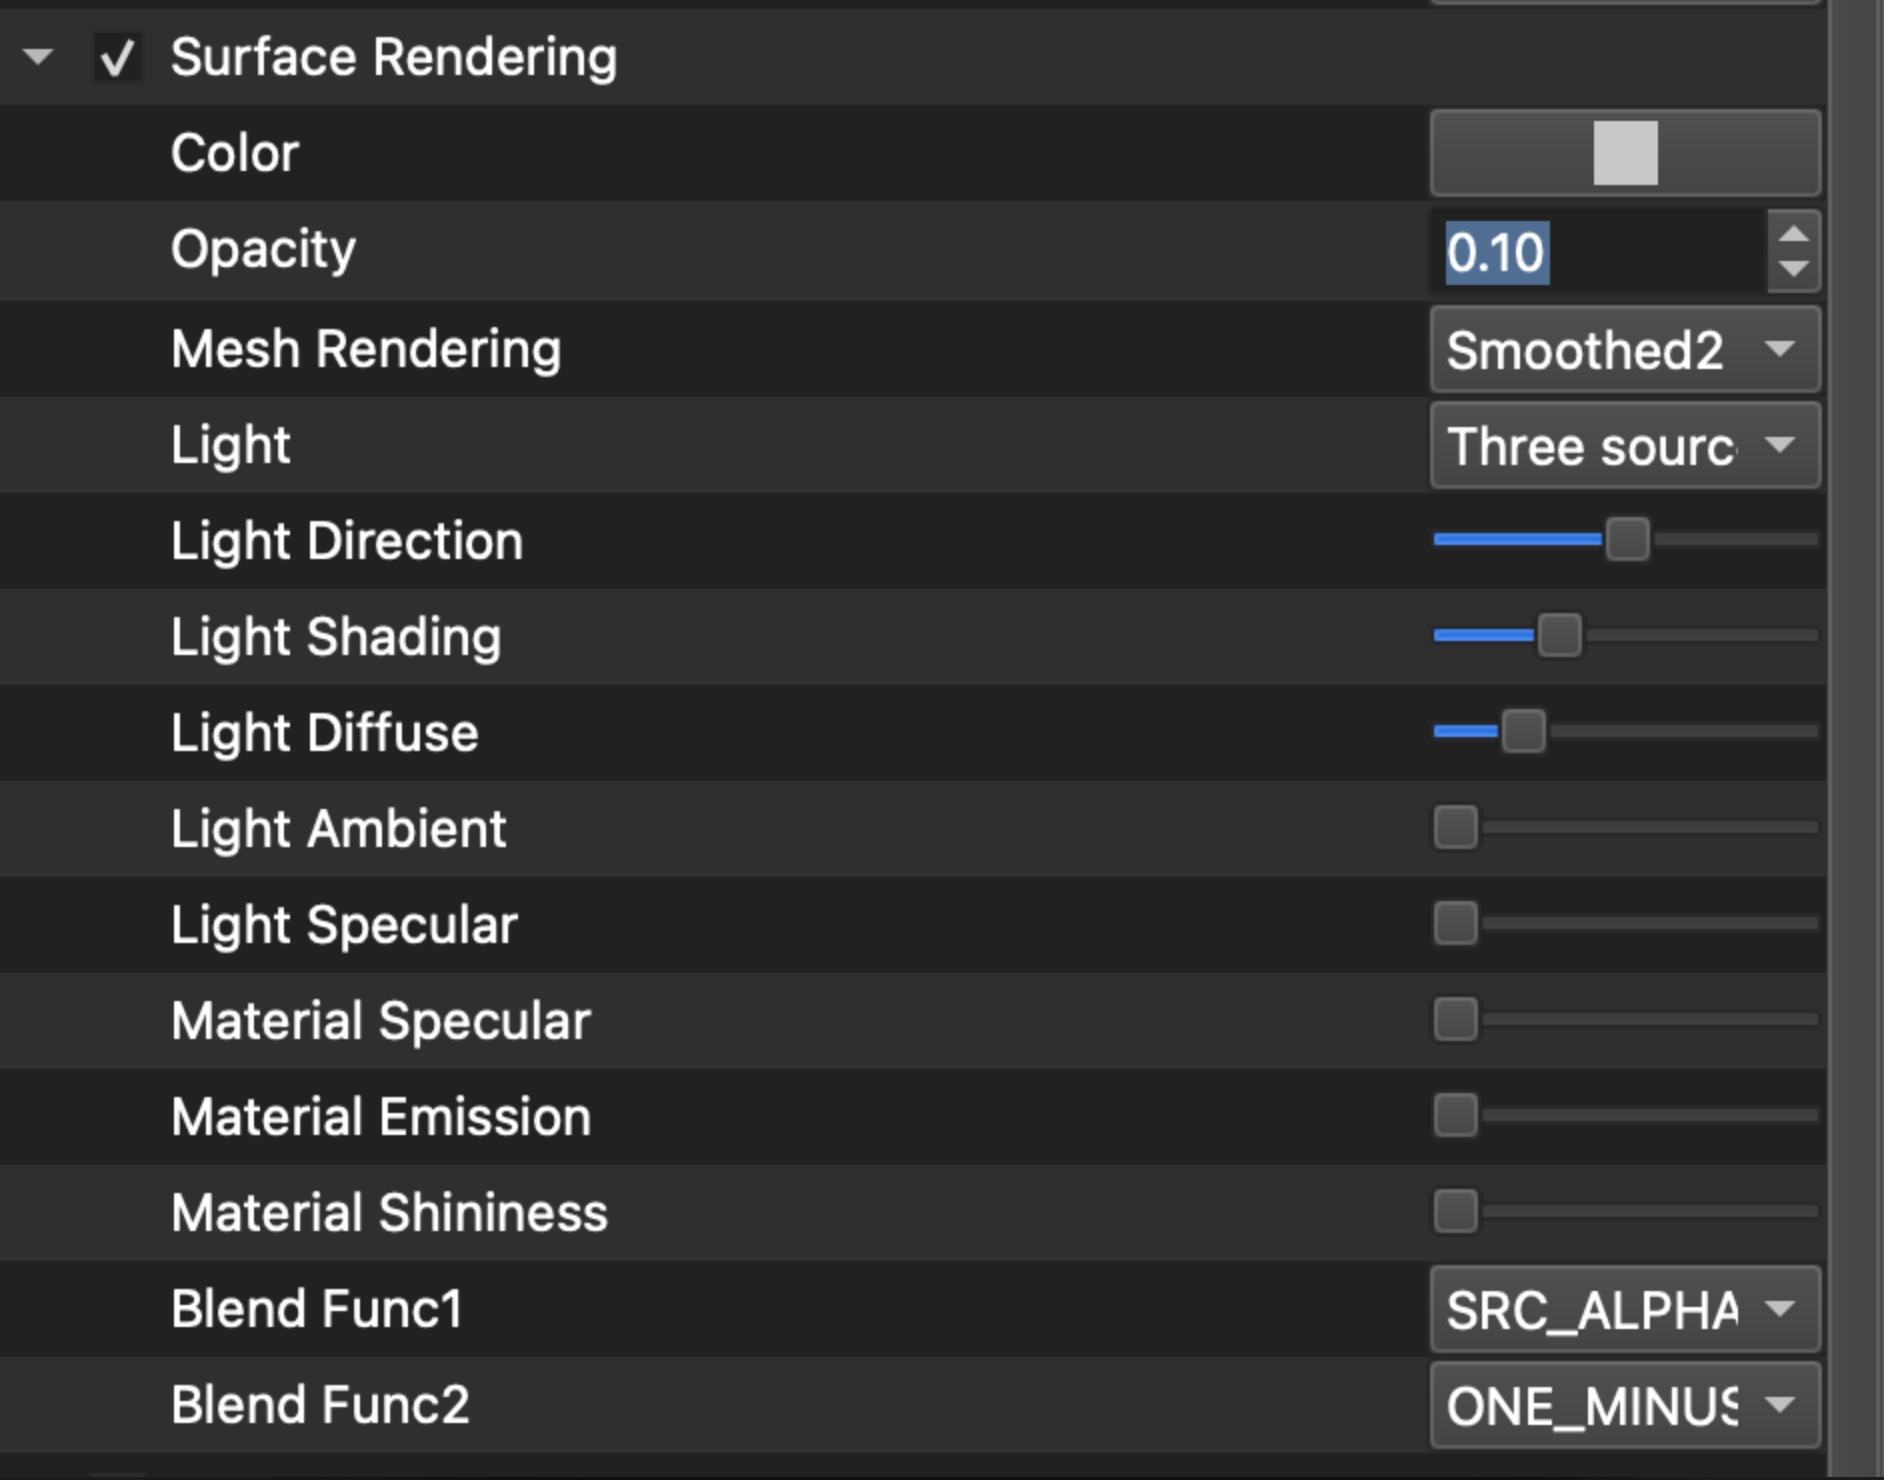
Layout
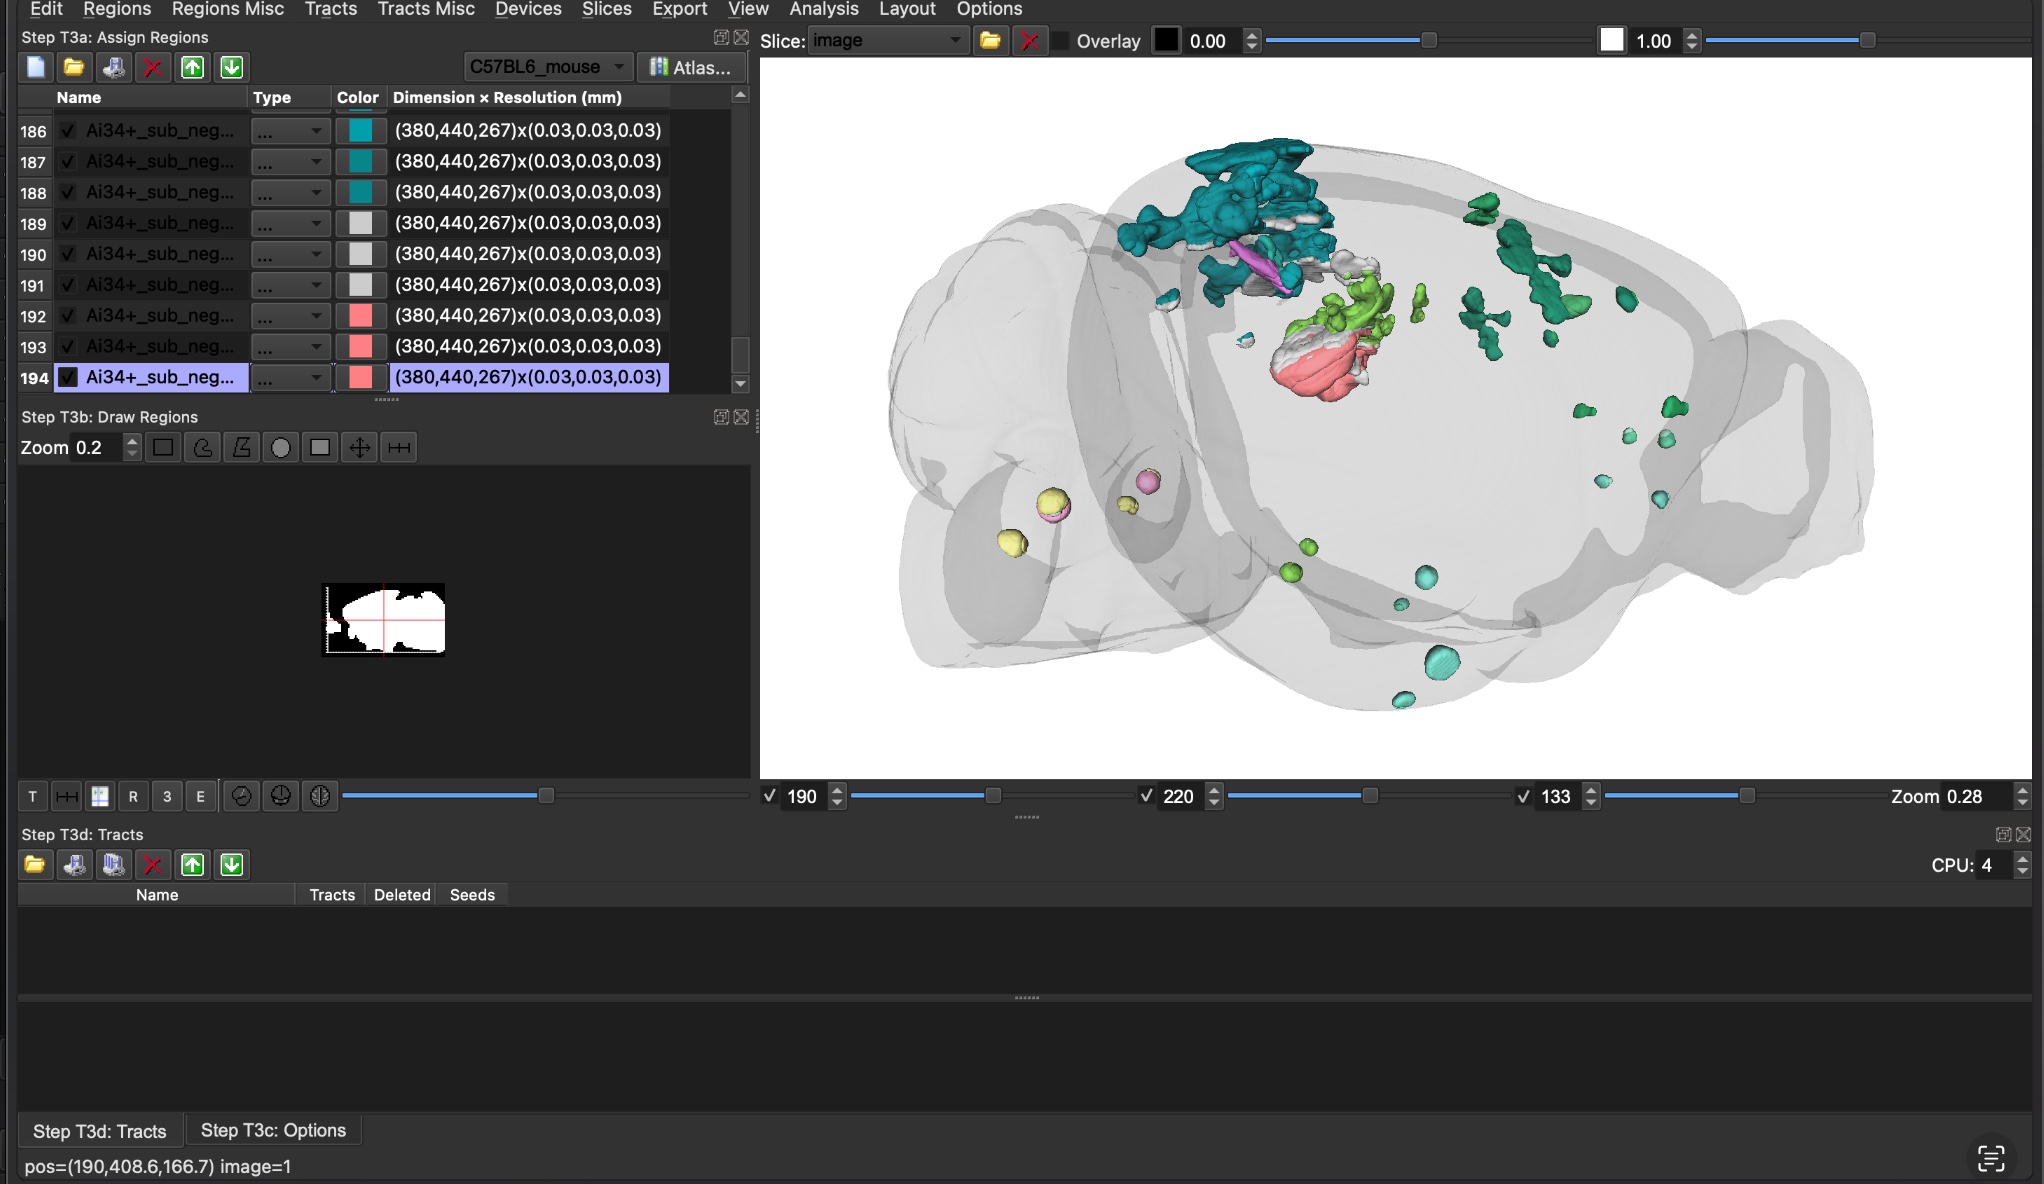
The zoom and viewer dimensions determine the output video size.
This layout allows for 1080p videos with my MacBook (adjust as needed).
Move panels on the right down and make them as small as possible.
Line up the left edge of the viewer with View.
Zoom to the view 0.28 (lower right of viewer)
Zoom out to 0.18 for axial.
Adding Regions and Color
Regions –> Open Region… –> load
_q _rev_cluster_index__valid_clusters_ABA_WB.nii.gz
Regions Misc –> Load Region Color… –> load
_q _rev_cluster_index__valid_clusters_rgba.txt
Making Figures
Use
z,x, andcto snap to specific orientations.Use View –> Save Camera View… to save an oblique orientation
Load it with: View –> Open Camera View…
Capture screenshots
Recording Videos
For a video: press
zfor a sagittal orientation (e.g., facing to the right), View –> Save Rotation Video/Images…The output .avi is large, but can be exported in another format
For example, in Adobe Premiere Pro –> add the video to the timeline –> right click to double video speed –> export with SD resolution (480p) –> scale to fit –> export.
Composite videos with multiple cluster maps can be made with Adobe Premiere Pro using the exported videos.
Valid Cluster Info Tables#
Cluster info .xlsx tables are output by
cstats_validationfor each valid cluster map.Output location: valid_clusters_tables_and_legend
Alternatively, they can be made with
cstats_tableandcstats_legendCompile each
_q _valid_clusters_table.xlsx and legend.xlsx into one .xlsx SI table
Example SI Table from our initial UNRAVEL paper
Region-wise Statistics#
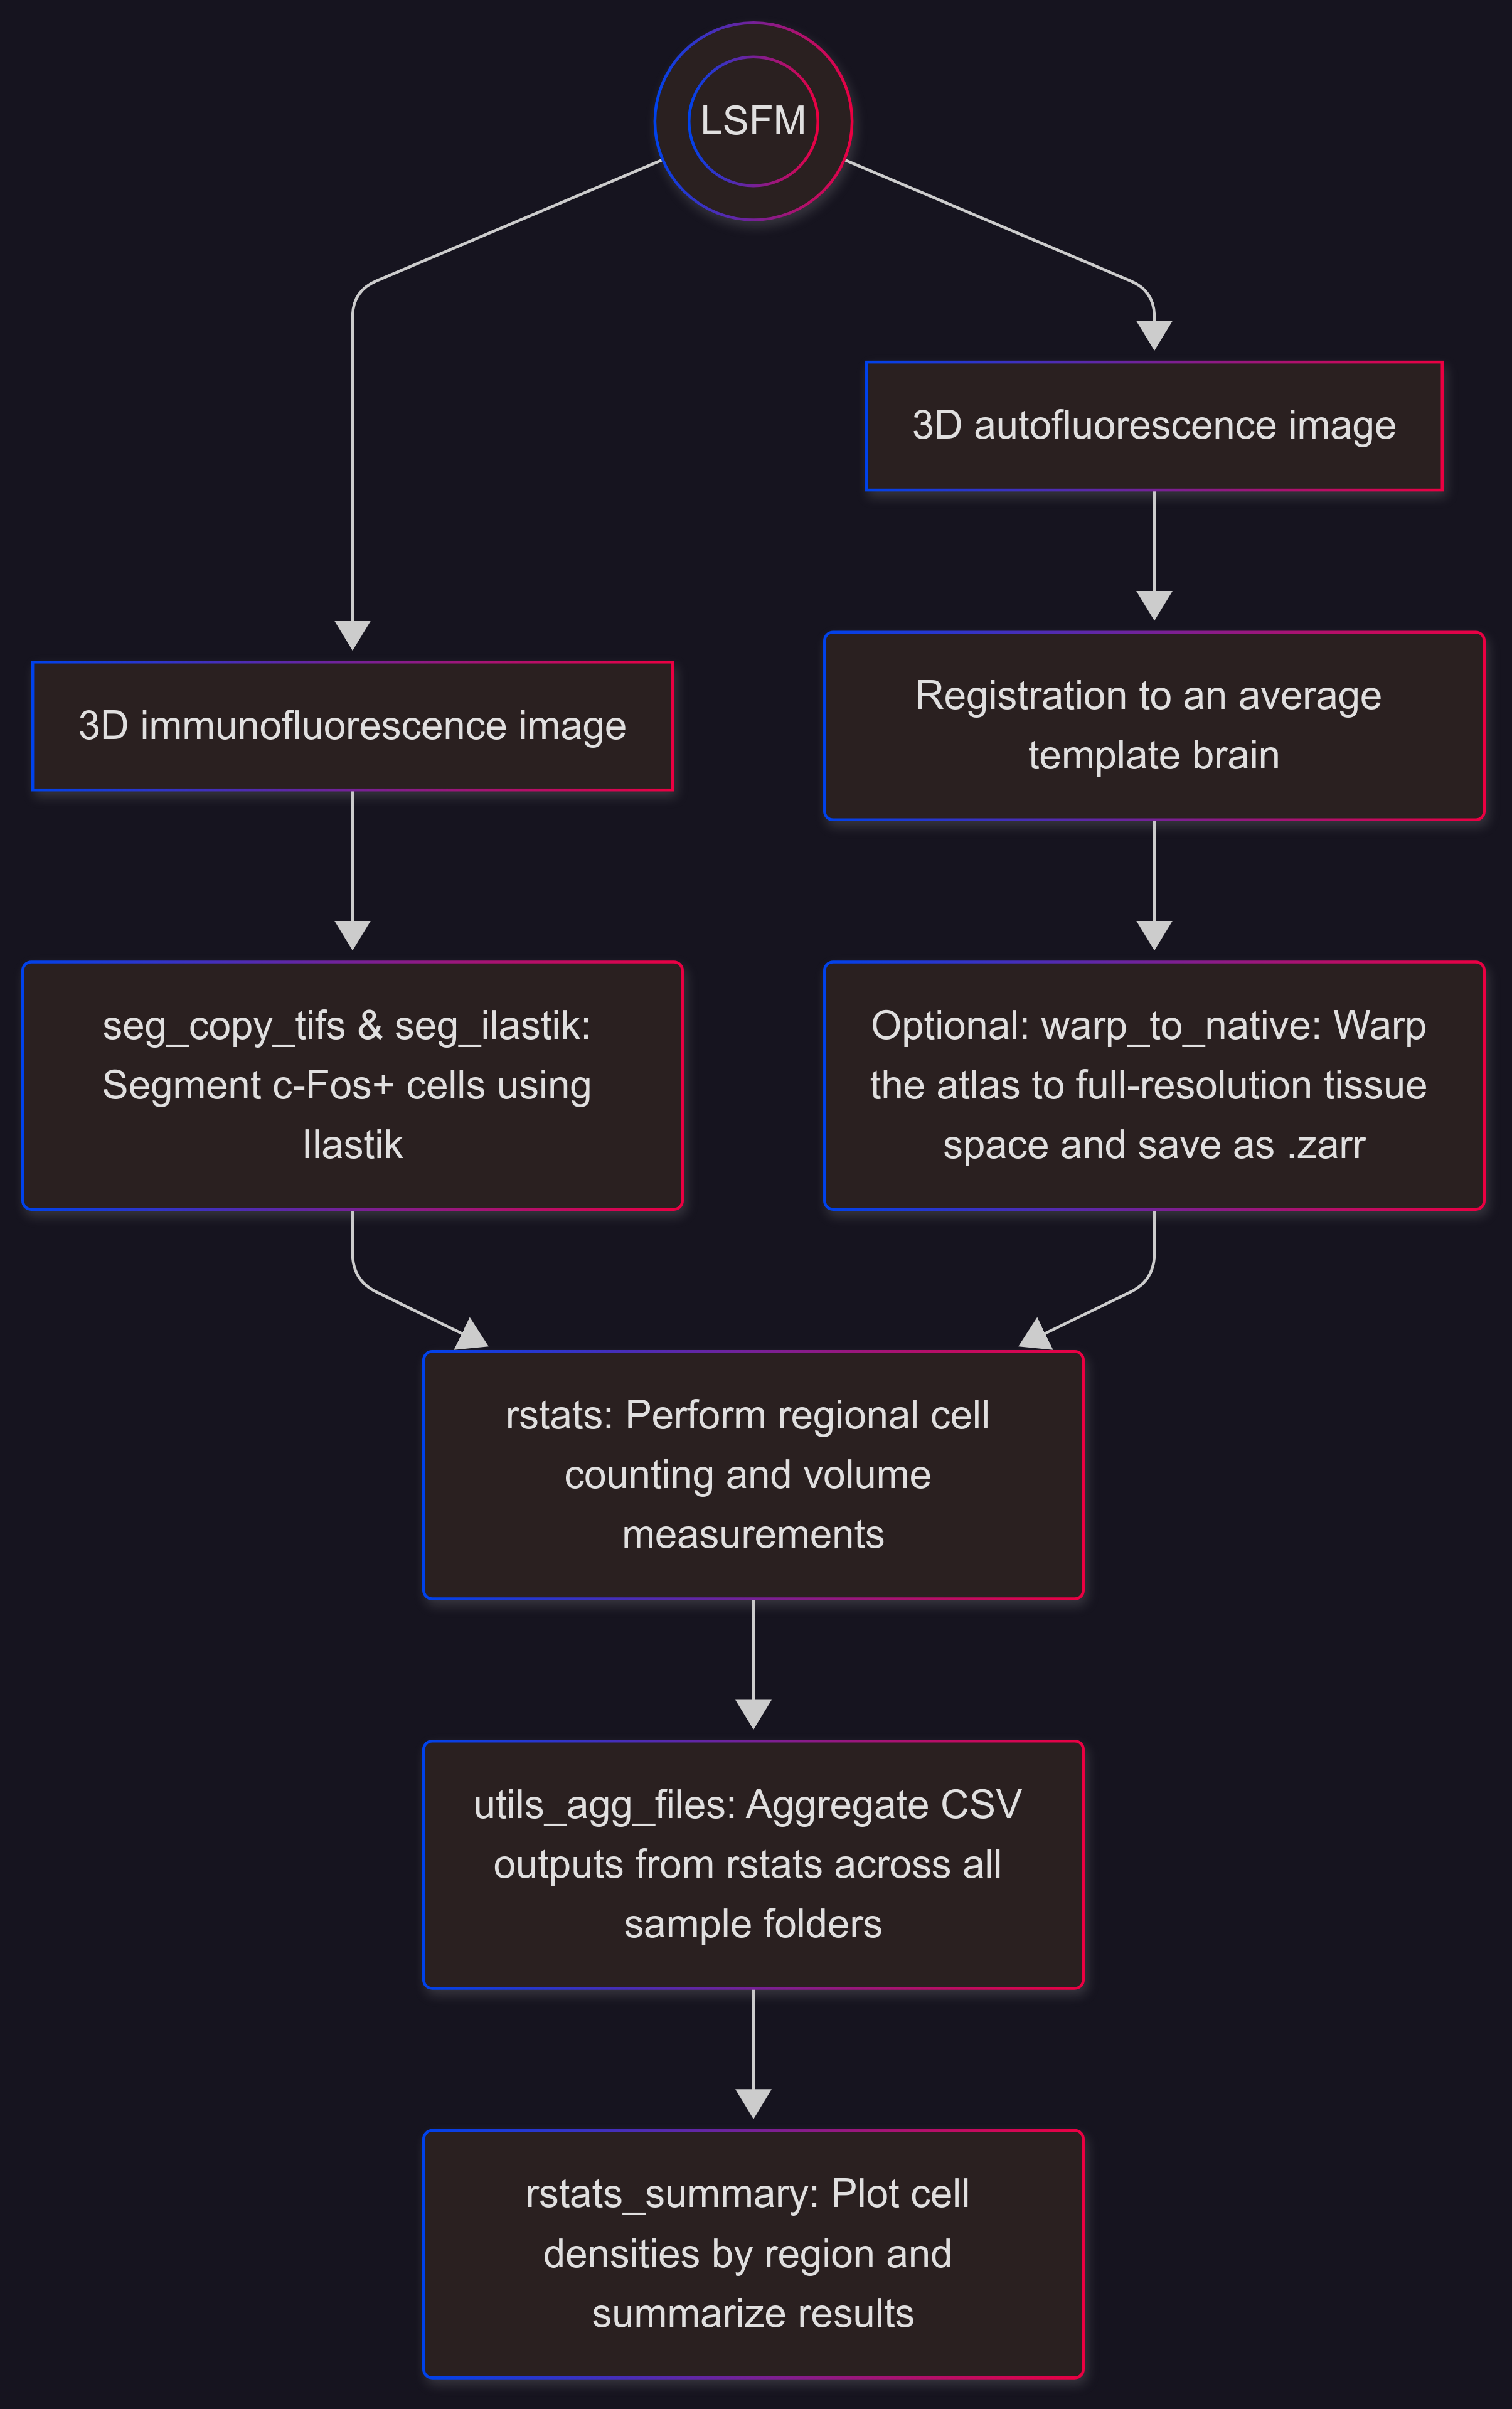
rstats#
unravel.region_stats.regional_cell_densities
Quantify regional cell densities or label densities
# Usage if the atlas is already in native space from ``warp_to_native``:
rstats -s <rel_path/segmentation_image.nii.gz> -a <rel_path/native_atlas_split.nii.gz> -c Saline -t cell_densities [-d <paths to sample folders in the Saline group or the folders containing them>]

# Usage if the native atlas is not available; it is not saved (faster):
rstats -s rel_path/segmentation_image.nii.gz -m $SPLIT -c Saline -t cell_densities [-d <paths to sample folders in the Saline group or the folders containing them>]
Aggregate outputs from rstats with utils_agg_files.
rstats_summary#
unravel.region_stats.regional_cell_densities_summary
Plot cell densities for each region and summarize results.
CSVs from
rstatsshould be in the current directoryCSV columns:
Region_ID,Side,Name,Abbr,Saline_sample06,Saline_sample07,…,MDMA_sample01,…,Meth_sample23,…
# Usage for Tukey tests:
rstats_summary --groups Saline MDMA Meth -hemi <both l or r> [-y cell_density] [-div 10000]
# -div 10000 divides cells per cubic mm by 10000 (for plotting)
# -y is the y-axis label

# Usage for t-tests:
rstats_summary --groups Saline MDMA -hemi <both l or r>  -t t-test -c Saline [-alt two-sided] [-y cell_density] [-div 10000]
Example sample?? Folder Structure#
.
├── atlas_space  # Dir with images warped to atlas space
├── cfos_seg_ilastik_1  # Example dir with segmentations from ilastik
├── clusters  # Dir with cell/label density CSVs from cstats_validation
│   ├── Control_v_Treatment_vox_p_tstat1_q0.005
│   │   └── cell_density_data.csv
│   └── Control_v_Treatment_vox_p_tstat2_q0.05
│       └── cell_density_data.csv
├── parameters  # Optional dir for things like metadata.txt
├── reg_inputs  # From reg_prep (autofl image resampled for reg) and seg_brain_mask (mask, masked autofl)
├── regional_cell_densities  # CSVs with regional cell densities data
├── reg_outputs  # Outputs from reg. These images are typically padded w/ empty voxels.
└── image.czi # Or other raw/stitched image type
Example Experiment Folder Structure#
.
├── exp_notes.txt
├── env_var.sh
├── sample_key.csv
├── Control
│   ├── sample01
│   └── sample02
├── Treatment
│   ├── sample03
│   └── sample04
├── atlas
│   ├── atlas_CCFv3_2020_30um.nii.gz  # Each atlas region has a unique intensity/ID
│   ├── atlas_CCFv3_2020_30um_split.nii.gz  # Intensities in the left hemisphere are increased by 20,000
│   ├── average_template_CCFv3_30um.nii.gz  # Average template brain that is aligned with the atlas
│   └── mask_CCFv3_2020_30um_RH_wo_root_ventricles_fibers_OB.nii.gz  # Right hemisphere mask that excludes undefined regions (root), ventricles, fiber tracts, and the olfactory bulb
├── check_reg  # run check_reg from here
├── brain_mask
│   ├── brain_mask.ilp  # Ilastik project trained with the pixel classification workflow to segment the brain in resampled autofluo images
│   ├── sample01_slice_0000.tif
│   ├── sample01_slice_0005.tif
│   ├── sample01_slice_0050.tif
│   ├── ...
│   └── sample04_slice_0050.tif
├── vstats  # Voxel-wise stats
│   └── Control_v_Treatment
│       ├── Control_sample01_rb4_atlas_space_z.tif
│       ├── Control_sample02_rb4_atlas_space_z.tif
│       ├── Treatment_sample03_rb4_atlas_space_z.tif
│       ├── Treatment_sample04_rb4_atlas_space_z.tif
│       └── stats
│           ├── Control_v_Treatment_vox_p_tstat1.nii.gz  # 1 minus p value map showing where Control (group 1) > Treatment (group2)
│           ├── Control_v_Treatment_vox_p_tstat2.nii.gz  # 1-p value map showing where Treatment (group 2) > Control (group 1)
│           ├── Control_v_Treatment_vox_p_tstat1_q0.005  # cluster correction folder
│           │   ├── 1-p_value_threshold.txt  # FDR adjusted 1-p value threshold for the uncorrected 1-p value map
│           │   ├── p_value_threshold.txt  # FDR adjusted p value threshold
│           │   ├── min_cluster_size_in_voxels.txt  # Often 100 voxels for c-Fos. For sparser signals like amyloid beta plaques, consider 400 or more
│           │   └── ..._rev_cluster_index.nii.gz # cluster map (index) with cluster IDs going from large to small (input for cstats_validation)
│           ├── ...
│           └── Control_v_Treatment_vox_p_tstat2_q0.05
├── cstats  # cluster stats (validation)
│   ├── Control_v_Treatment_vox_p_tstat1_q0.005
│   │   ├── Control_sample01_cell_density_data.csv
│   │   ├── Control_sample02_cell_density_data.csv
│   │   ├── Treatment_sample03_cell_density_data.csv
│   │   ├── Treatment_sample04_cell_density_data.csv
│   │   ├── _valid_clusters  # Contains data for sunburst plots, 3D brains, the xlsx table, etc.
│   │   ├── _valid_cluster_stats  # Contains t-test_results.csv for adding asterisks to the xlsx table, etc.
│   │   ├── _valid_clusters_prism  # For making valid cluster bar graphs with GraphPad Prism. Clusters are sorted by anatomy (refer to the xlsx table for annotating it)
│   │   └── p_value_threshold.txt
│   ├── 3D_brains  # Use these for vizualization in DSI Studio
│   ├── valid_clusters_tables_and_legend  # Use these .xlsx tables to make an SI table
│   ├── cluster_validation_summary_t-test.csv  # Use this to summarize cluster validation rates, etc.
│   ├── ...
│   └── Control_v_Treatment_vox_p_tstat2_q0.05
└── rstats # regional stats
    ├── Control_sample01_regional_cell_densities.csv
    ├── ...
    ├── Treatment_sample04_regional_cell_densities.csv
    ├── regional_cell_densities_all.csv
    └── Folders with plots for each region